The Accounts Role – Payroll User Guide is designed to provide accountants and payroll administrators with a comprehensive understanding of managing payroll operations within the system. This guide covers essential functions such as approving financial transactions, configuring payroll settings, handling tax computations, generating and releasing salaries, and generating detailed reports. With step-by-step instructions and easy navigation, users can efficiently process payroll, ensure compliance, and maintain accurate financial records. Whether you are approving no-dues requests, configuring deductions, or reviewing salary components, this guide serves as a reliable resource for seamless payroll management.
Accessing the Dashboard
1. Open your web browser and navigate to the {provided link}
2. Log in to the dashboard using your assigned credentials.
Dashboard Home
1. Upon logging in, you will be directed to the Dashboard Home page.
2. The Dashboard Home page displays an overview of key metrics and quick links to other sections of the dashboard.
3. Review the metrics and click on any quick links to access specific functionalities.
Separation
The Separation section of the Accounts Role – Payroll User Guide provides accountants with a streamlined approach to managing employee offboarding processes. This section covers key tasks such as approving no-dues requests and processing Full and Final (FNF) settlements, ensuring smooth transitions for departing employees. With clear step-by-step instructions, accountants can efficiently review, approve, or reject pending requests while maintaining accurate financial records. By following this guide, users can ensure compliance with company policies and financial accuracy in the separation process.
Approve No dues
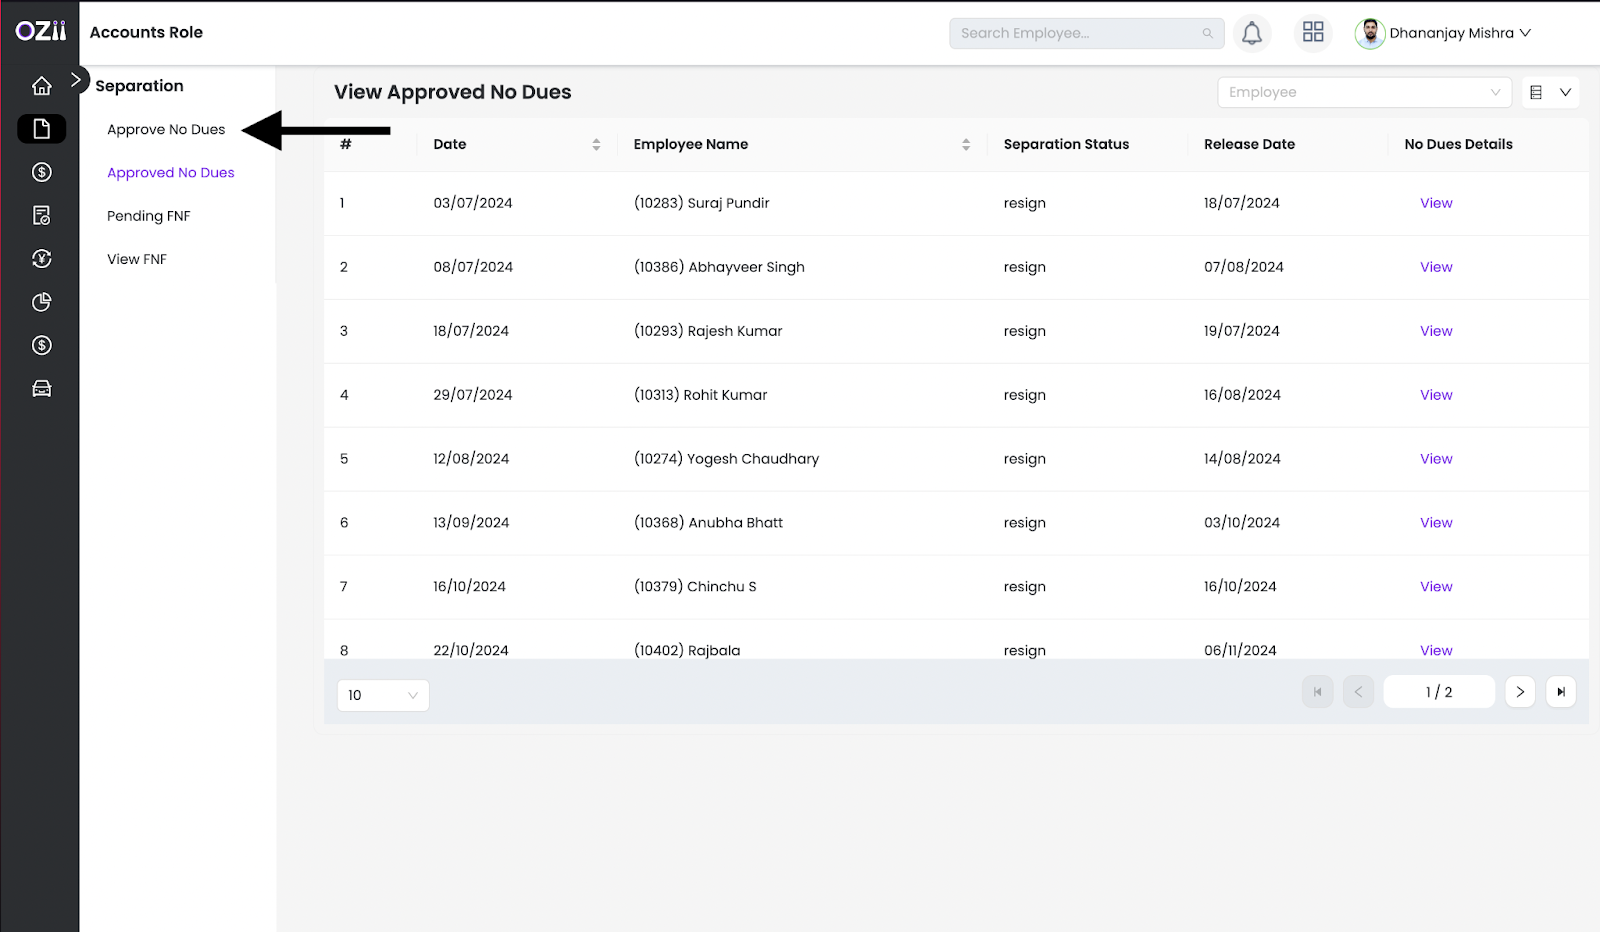
– Step 1: Locate & Select the Approve No Dues section on the sidebar of the page under the section Separation while being on the accounts role.
– Step 2: The Accountant can approve or reject any particular pending No dues on the listed separation employee.
All the approved no-dues statuses can be seen on the Approved No Dues page.
Pending FNF (full and final)
– Step 1: Locate & Select the Pending FNF section on the sidebar of the page under the section Separation while being on the accounts role.
– Step 2: The Accountant can approve or reject any particular pending FNF on the listed separation employee.
All the approved no-dues statuses can be seen on the View FNF page.
Payroll Settings
The Payroll Settings section of the Accounts Role – Payroll User Guide provides accountants with the tools to configure and customize payroll parameters for accurate salary processing. This section covers essential tasks such as managing financial years, setting up income tax rules, configuring cess and surcharge settings, and defining salary components. With step-by-step instructions, users can easily add, edit, or delete payroll variables to ensure compliance with tax regulations and organizational policies. By leveraging these settings, accountants can maintain precise payroll structures, streamline salary calculations, and enhance overall payroll management efficiency.
Dropdown Settings
– Step 1: Locate & Select the Dropdown section on the sidebar of the page under the section Payroll Settings while being on the accounts role.
– Step 2: Select the Unit(Name) of dropdown of which variables to be manipulated.
– Step 3: A list of variables, if pre-set will be visible on the right, Accountants have edit/delete options.
– Step 4: To add an Additional variable accountant can type the variable in the value box & Save. All saved variables will be visible on the right.
Financial year
Add Financial year
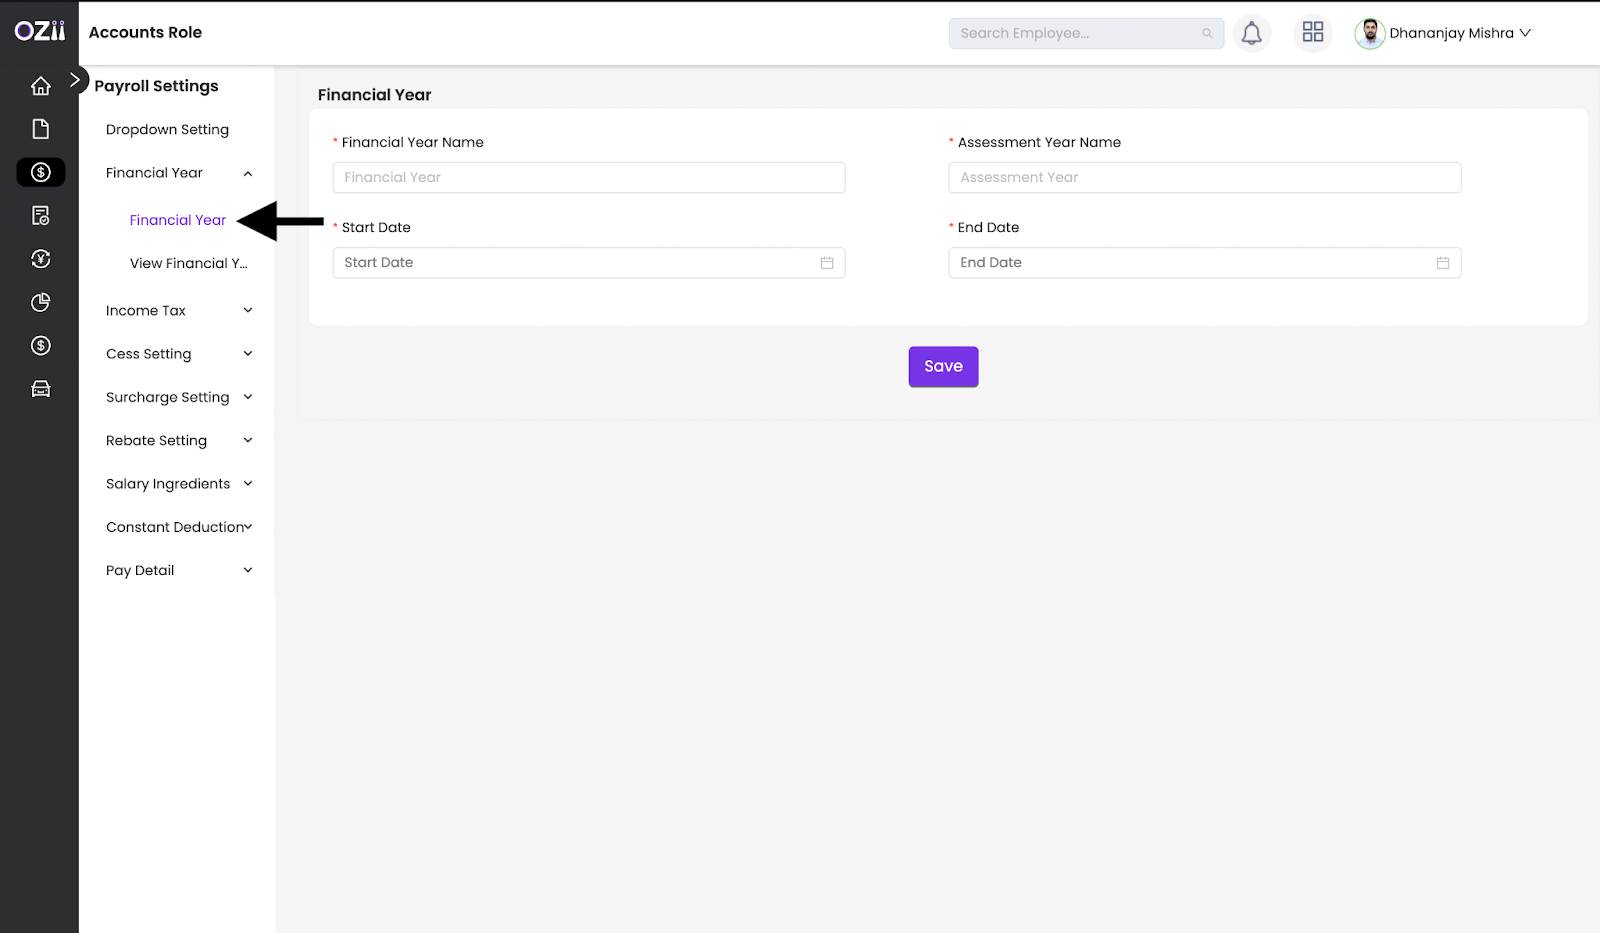
– Step 1: Locate & Select the Financial Year section on the sidebar of the page under the subsection Financial Year under the section Payroll settings, while being on the accounts role.
– Step 2: Enter the following details on the form:

- Specify the financial year name
- Specify the assessment year name
- Select start date
- Select end date
– Step 3: Once all details are finalized, the Accountant can click on save to the financial year setting. All the saved financial year settings can be seen on the View financial year page. The option to edit/delete is available.
Income tax
Add Income Tax
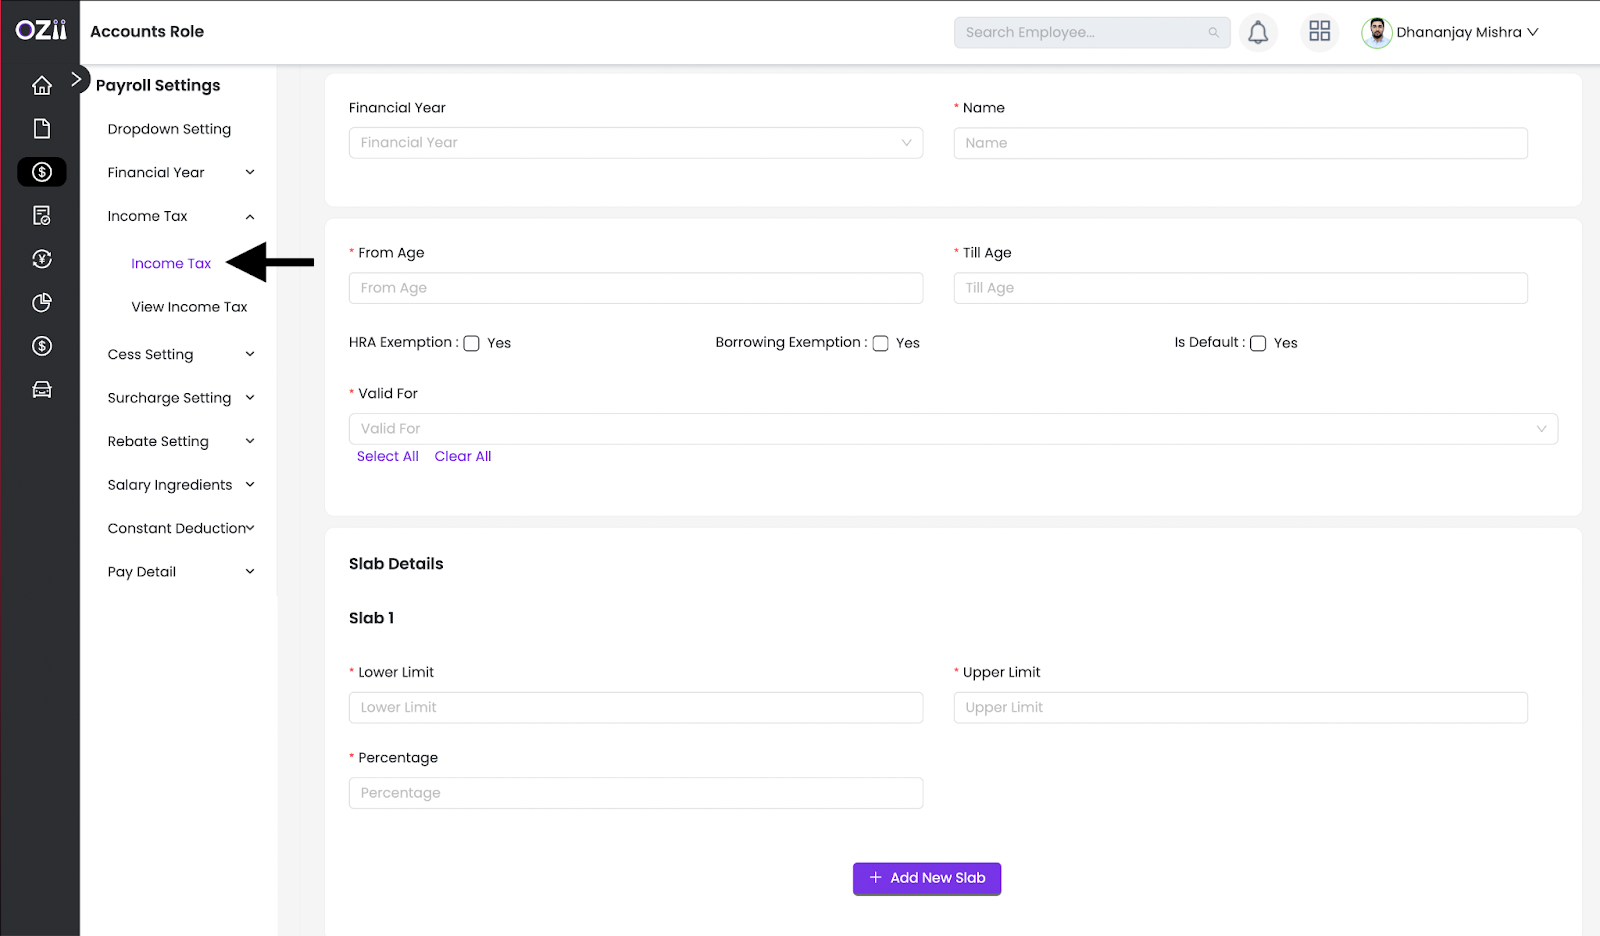
– Step 1: Locate & Select the Income tax section on the sidebar of the page under the subsection Income tax under the section Payroll settings, while being on the accounts role.
– Step 2: Enter the following details on the form:
- Select The financial year
- Specify the name for the same
- Specify from Age
- Specify to Age
- Check Box for HRA exemption is available
- Check Box for borrowing exemption is available
- Check Box for is default is available
- Select valid for Male or female
– Step 3: Enter the following details on the slab details form:
- Specify the lower limit
- Specify the Upper limit
- Specify Percentage
- The option to Add another slab is available in the same form.
– Step 4: Once all details are finalized, the Accountant can click on save to the Income tax year setting. All the Income tax year settings can be seen on the View Income tax page.

Cess settings
Add Cess
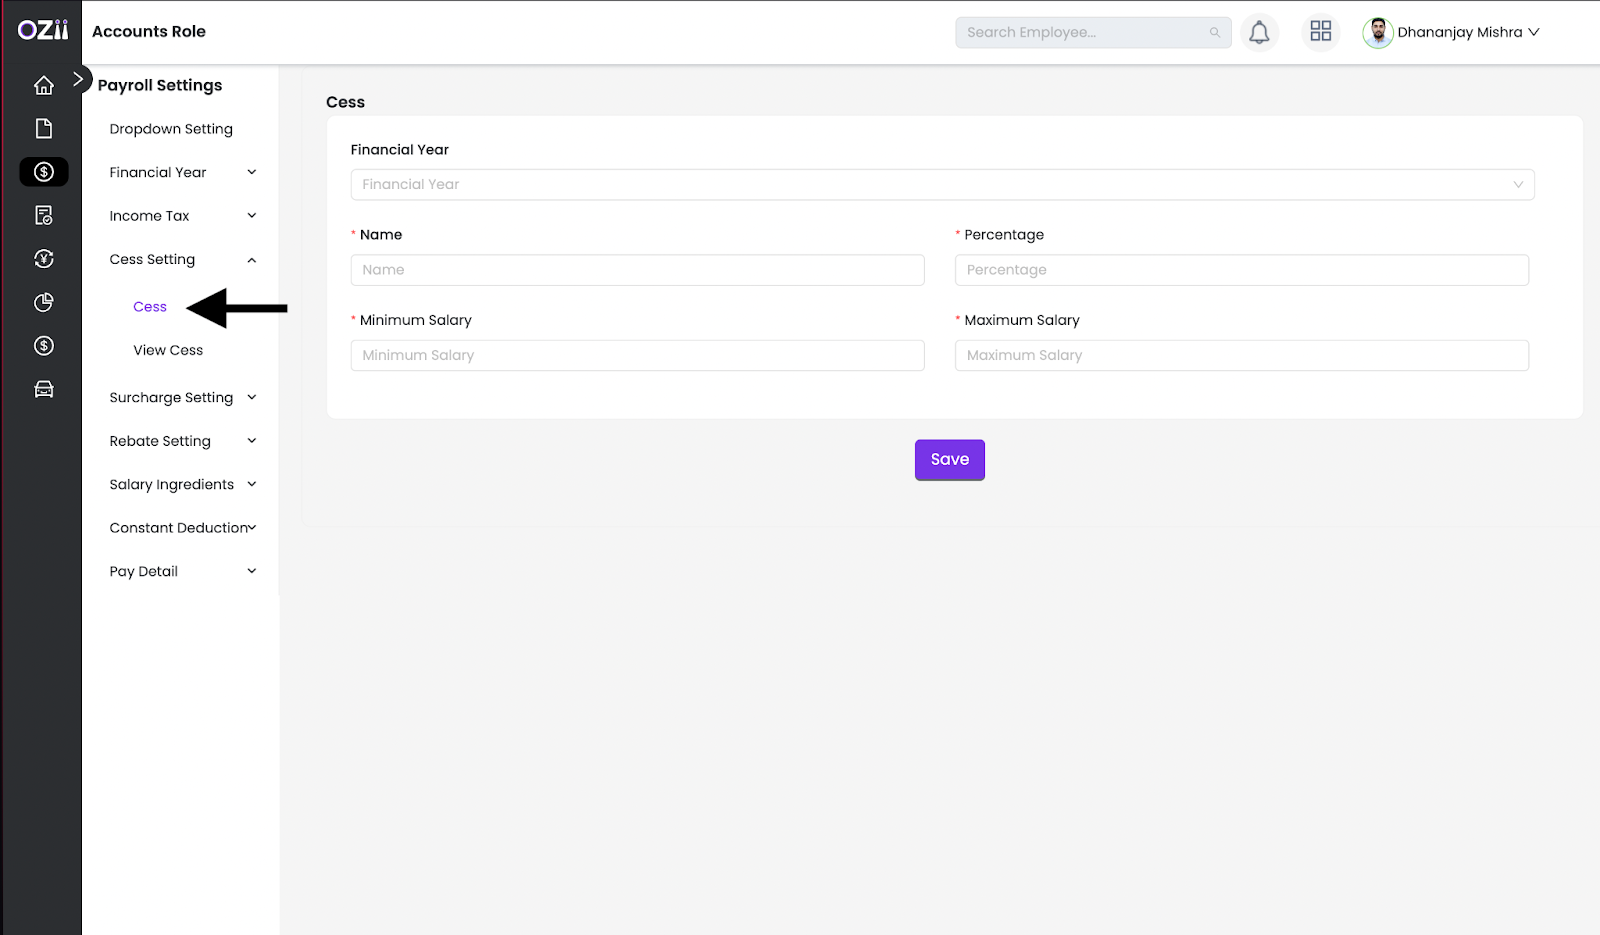
– Step 1: Locate & Select the Cess section on the sidebar of the page under the subsection Cess Settings under the section Payroll settings, while being on the accounts role. The option to edit/delete is available.
– Step 2: Enter the following details on the form:
- Select The financial year
- Specify name
- Specify Percentage
- Specify Minimum salary
- Specify Maximum Salary
– Step 3: Once all details are finalized, the Accountant can click on save to save the cess setting. All the saved Cess settings can be seen on the View cess page. The option to edit/delete is available.
Surcharge
Add Surcharge
– Step 1: Locate & Select the Surcharge section on the sidebar of the page under the subsection Surcharge under the section Payroll settings, while being on the accounts role.
– Step 2: Enter the following details on the form:
- Select The financial year
- Specify name
- Select the TAX regime
- Specify Percentage
- Specify Minimum salary
- Specify Maximum Salary
– Step 3: Once all details are finalized, the Accountant can click on save to save the surcharge setting. All the saved surcharge settings can be seen on the View surcharge page. The option to edit/delete is available.
Rebate
Add Rebate
– Step 1: Locate & Select the Rebate section on the sidebar of the page under the subsection rebate under the section Payroll settings, while being on the accounts role.
– Step 2: Enter the following details on the form:
- Select The financial year
- Specify name
- Select the TAX regime
- Specify Maximum Amount
- Specify Minimum salary
- Specify Maximum Salary
– Step 3: Once all details are finalized, the Accountant can click on save to save the rebate setting. All the saved rebate settings can be seen on the View rebate page. The option to edit/delete is available.
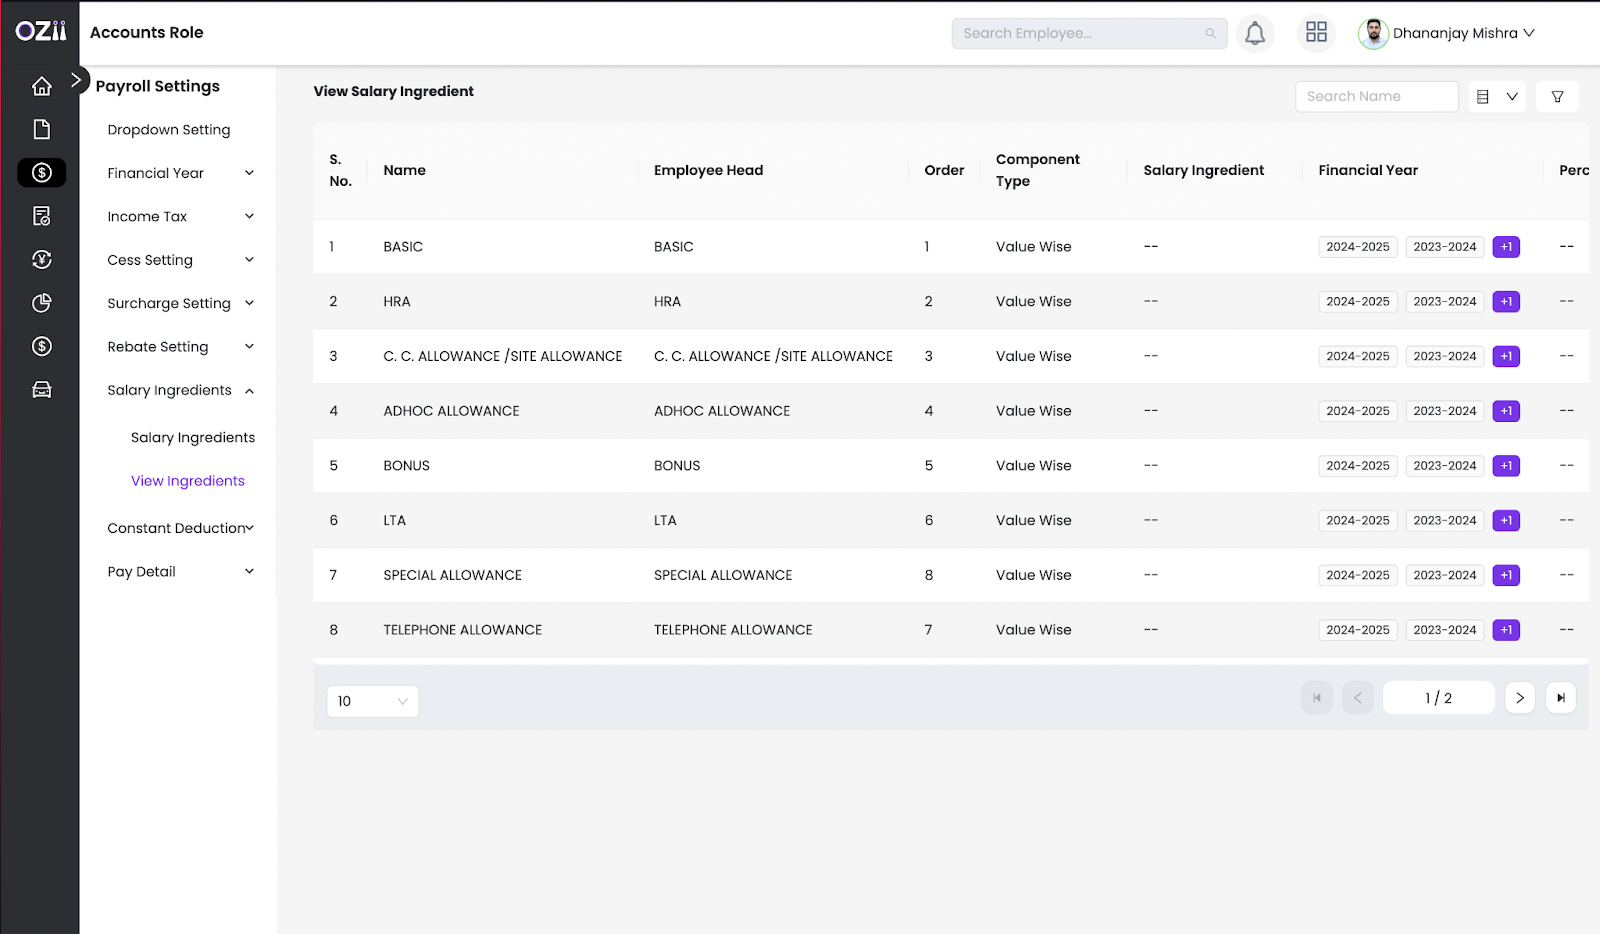
Salary Ingredient
Add salary ingredient
– Step 1: Locate & Select the salary Ingredient section on the sidebar of the page under the subsection salary ingredient under the section Payroll settings, while being on the accounts role.
– Step 2: Enter the following details on the form:
- Specify the name
- Specify Employee head
- Specify order
- Select Component type
- Select nature type
- Select tax status
- Select financial year
- Check Box for Add in case of arrears is available
- Check Box for Show in pay slip is available
– Step 3: Once all details are finalized, the Accountant can click on save to save the particular salary ingredient. All the saved salary ingredients can be seen on the View ingredient page. The option to edit/delete is available.

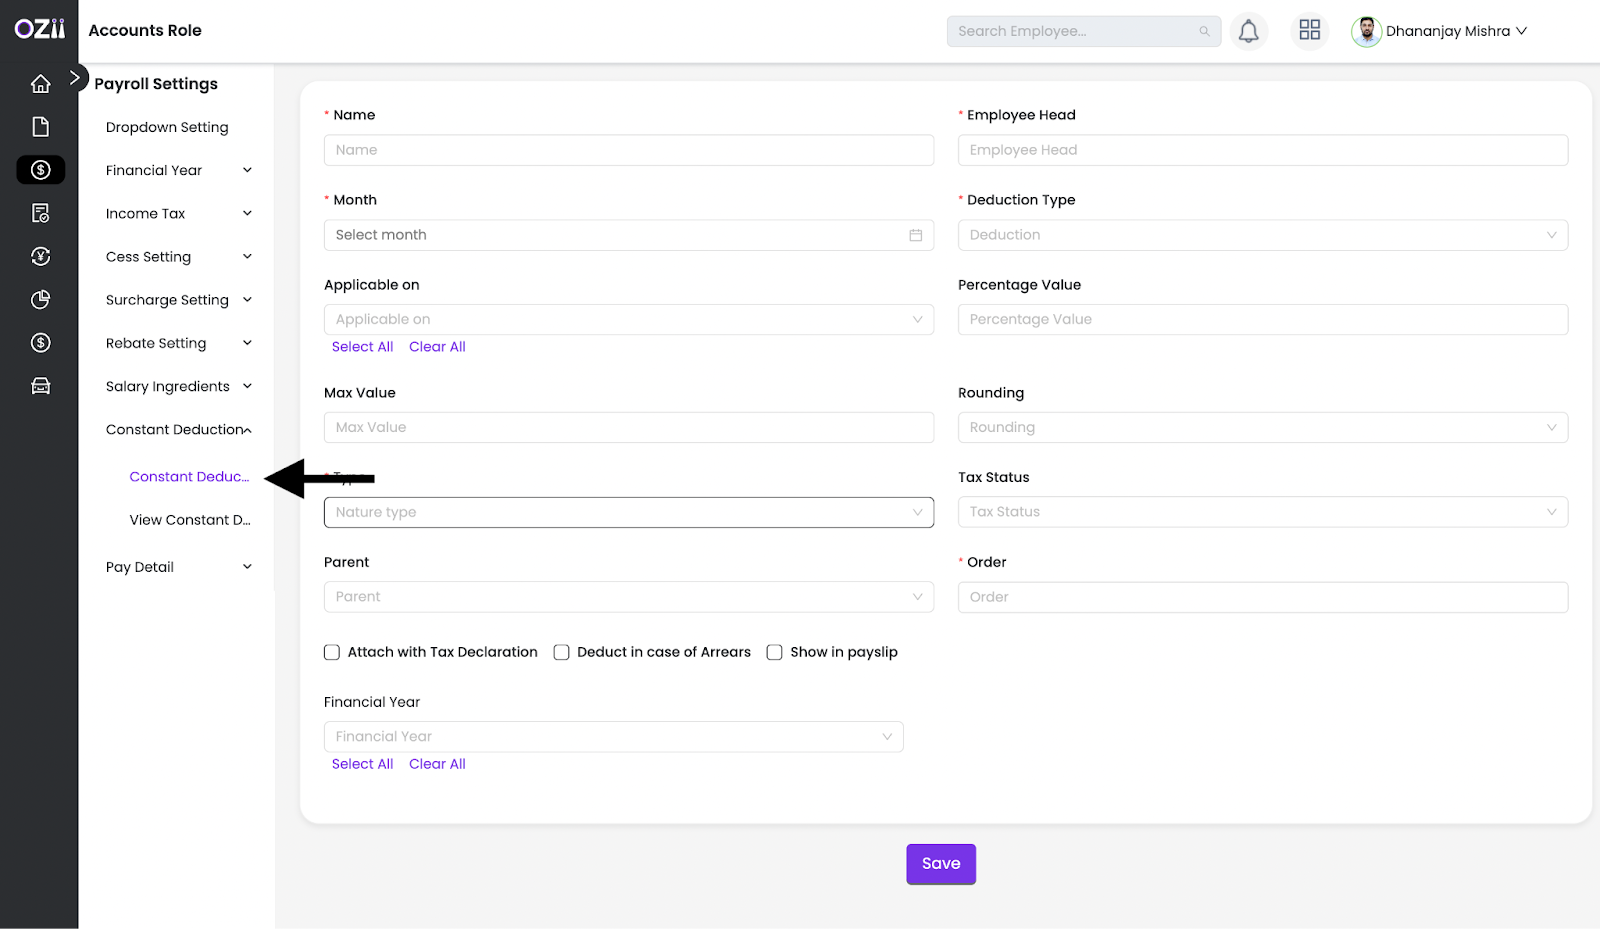
Constant Deductions
Add constant deductions
– Step 1: Locate & Select the constant deduction section on the sidebar of the page under the subsection constant deduction under the section Payroll settings, while being on the accounts role.
– Step 2: Enter the following details on the form:
- Specify the name
- Specify Employee head
- Select month
- Select deduction type
- Select applicable on ingredients ( Option to Select all/clear all is available )
- Specify Percentage value
- Specify max value
- Select rounding
- Select nature type
- Select Tax status
- Select parent
- Specify order
- Check Box for Attach with tax declaration is available
- Check Box for Show in pay slip is available
- Check Box for deduction in case of arrears is available
- Select financial year ( Option to Select all/clear all is available )
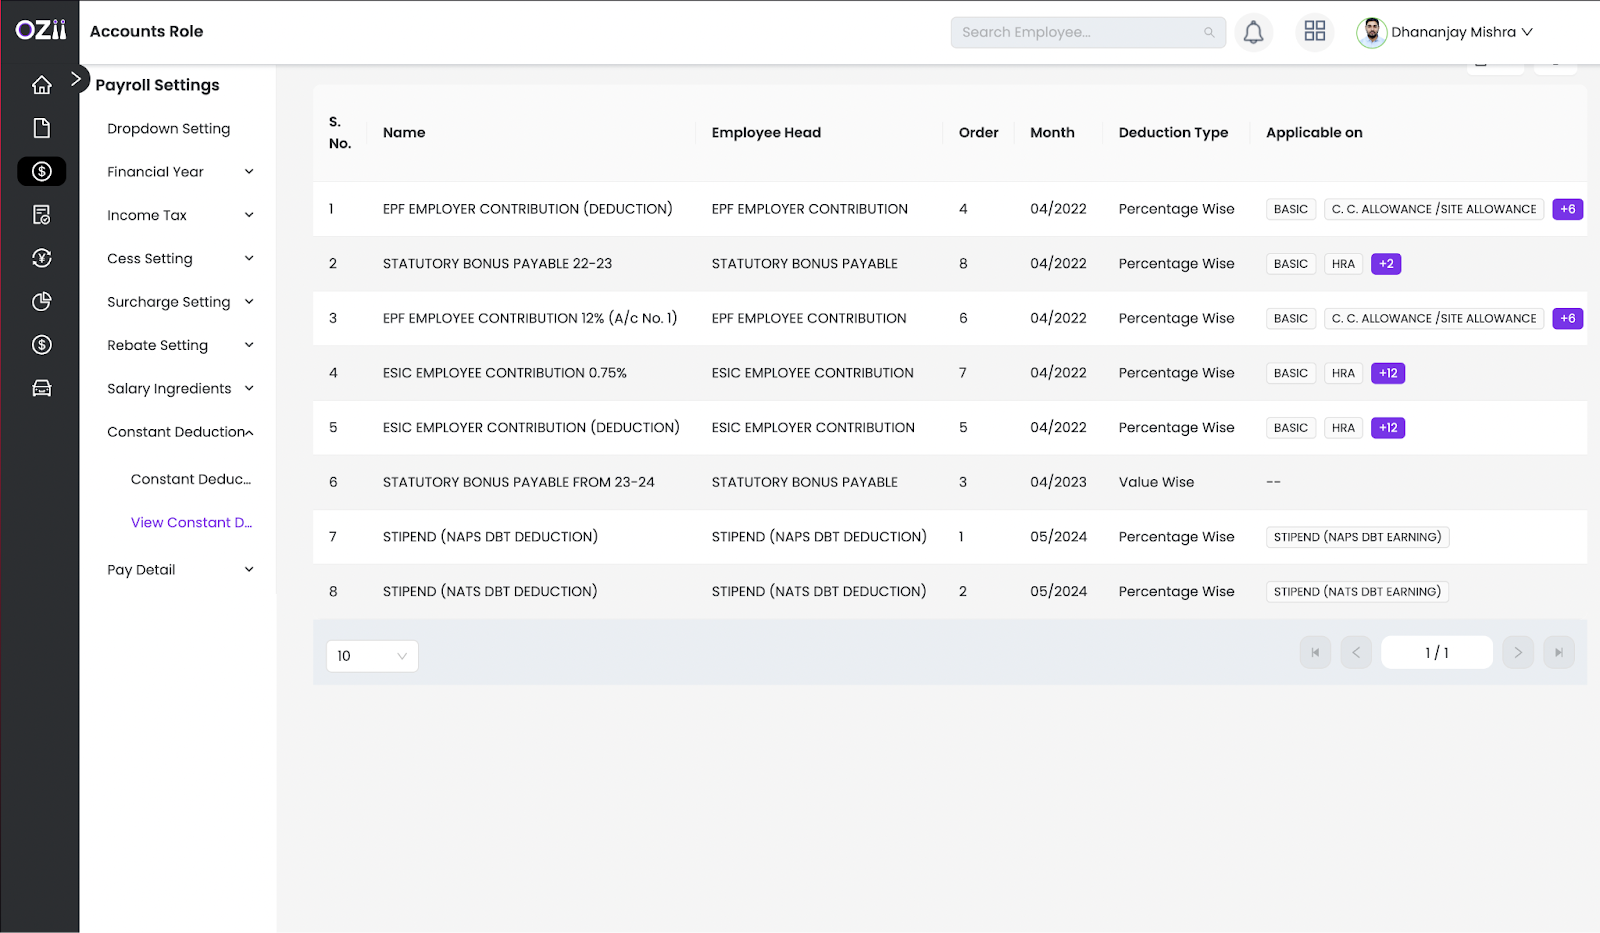
– Step 3: Once all details are finalized, the Accountant can click on save to save the constant deduction. All the saved constant deductions can be seen on the View constant deductions page. The option to edit/delete is available.
Pay details
Add Pay details
– Step 1: Locate & Select the Pay details section on the sidebar of the page under the subsection pay details under the section Payroll settings, while being on the accounts role.
– Step 2: Enter the following details on the employe pay details form:
- Specify the valid from date
- Select the employee to be paid.
- Select Payment mode
- Mention account name ( If not pre-filled by the system after selecting employee )
- Specify bank Account number ( If not pre-filled by the system after selecting employee )
- Specify IFSC code ( If not pre-filled by the system after selecting employee )
- Specify PAN number ( If not pre-filled by the system after selecting employee )
- Specify UAN number ( If not pre-filled by the system after selecting employee )
- Specify AADHAR number ( If not pre-filled by the system after selecting employee )
- Select Constant Deduction
– Step 2: Enter the following details on the selected items from the list of salary components displayed:
- A checkbox for the salary components is available
- Specify the value for the same component
– Step 3: Once all details are finalized, the Accountant can mention notes & click on save to save the pay details. All the saved pay details can be seen on the View pay detials page. The option to edit/delete is available.

Declaration Settings
The Declaration Settings section of the Accounts Role – Payroll User Guide equips accountants with the tools to manage employee tax declarations effectively. This section covers key functions such as configuring declaration forms, unlocking Forms 12B and 12BB, and approving submitted declarations. With clear step-by-step instructions, users can ensure accurate tax computations, streamline compliance processes, and facilitate seamless employee tax submissions. By utilizing these settings, accountants can maintain organized tax records, verify declarations efficiently, and support a smooth payroll workflow.
Settings
Add Settings
– Step 1: Locate & Select the Settings section on the sidebar of the page under the subsection Settings under the section Declaration settings, while being on the accounts role.
– Step 2: Enter the following details on the form:
- Select The financial year
- Specify the name
- Select form name ( Option to Select all/clear all is available )
- Select tax regime ( Option to Select all/clear all is available )
- A checkbox for Disabled is available
- A checkbox for Age is available
– Step 3: Once all details are finalized, the Accountant can click on save to save the settings. All the saved Settings can be seen on the View settings page. The option to edit/delete is available.

Unlock Form 12BB
Add
– Step 1: Locate & Select the Addsection on the sidebar of the page under the subsection Unlock form 12BB under the section Declaration settings while being on the accounts role.
– Step 2: Enter the following details on the form:
- Select The financial year
- Select Department
- Select Business Unit
- Select Employment type
- Select project
- Select Employees
- Specify Start date
- Specify End date
- A checkbox for Allow uploads is available
- A checkbox for make not verify is available
– Step 3: Once all details are finalized, the Accountant can click on save to save the settings. All the saved Settings can be seen on the View page. The option to edit/delete is available
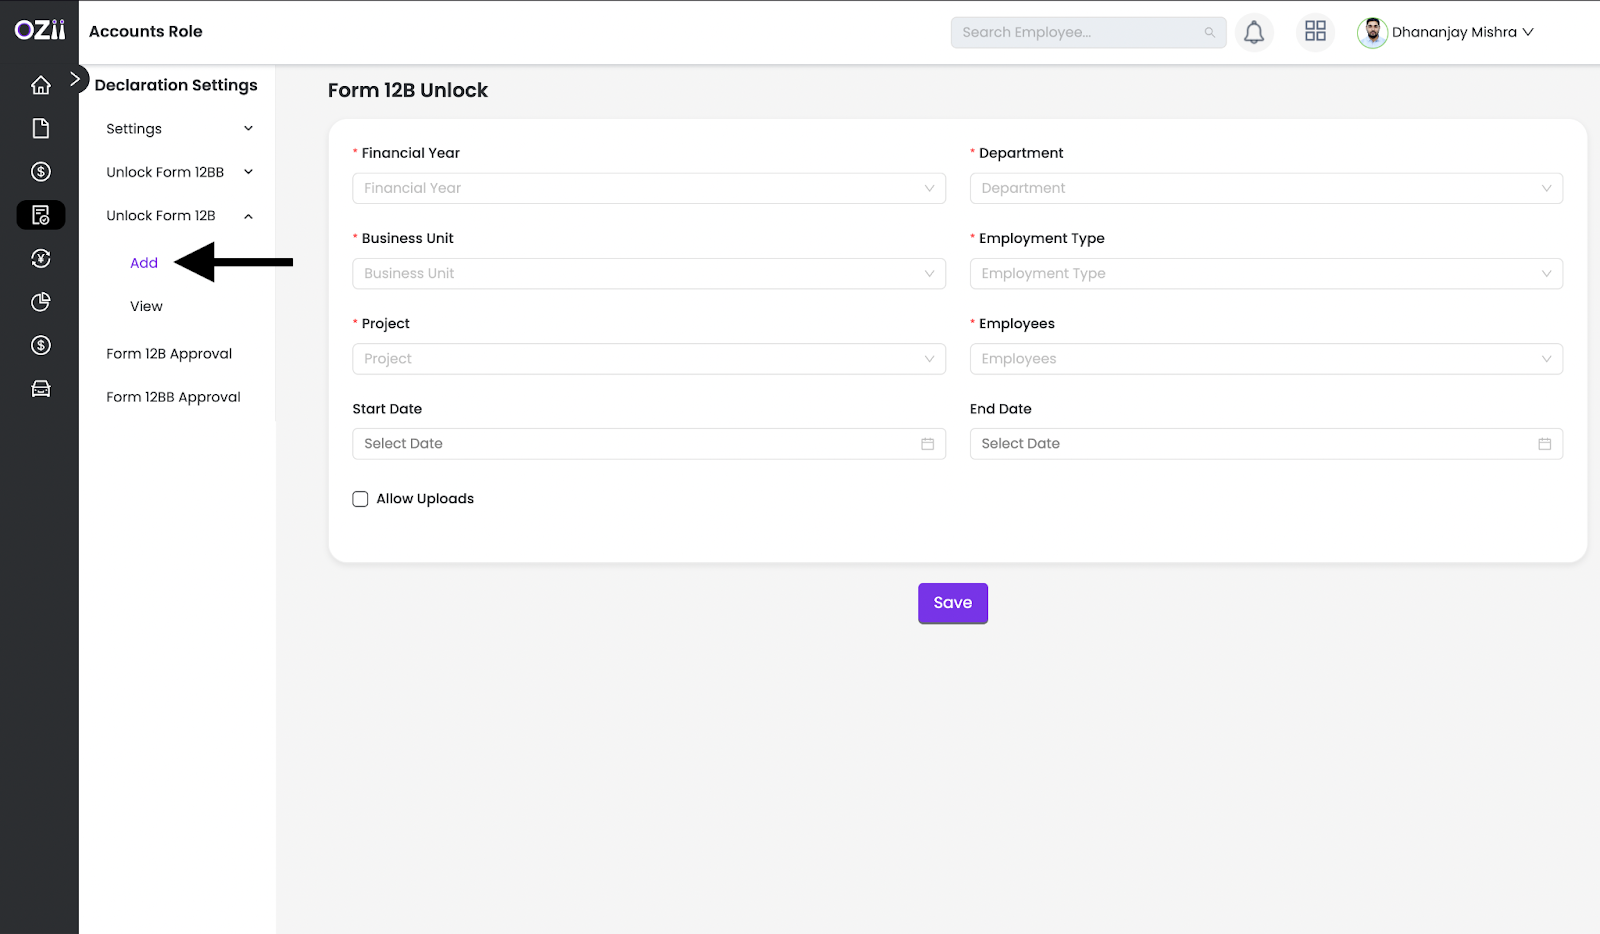
Unlock Form 12B

Add
– Step 1: Locate & Select the Add section on the sidebar of the page under the subsection Unlock form 12B under the section Declaration settings while being on the accounts role.
– Step 2: Enter the following details on the form:
- Select The financial year
- Select Department
- Select Business Unit
- Select Employment type
- Select project
- Select Employees
- Specify Start date
- Specify End date
- A checkbox for Allow uploads is available
– Step 3: Once all details are finalized, the Accountant can click on save to save the settings. All the saved Settings can be seen on the View page. The option to edit/delete is available
Form 12B Approval
– Step 1: Locate & Select the Form 12B Approval section on the sidebar of the page under section Declaration settings while being on the accounts role.
– Step 2: A list of 12B declaration statuses, employee wise will be visible.
– Step 3: Accountants Have multiple action options.
- View File ( If signed copy submitted by employee )
- View Details ( Employee Declaration form will open & editable if needed )
- Send a Reminder to the employee
Form 12BB Approval
– Step 1: Locate & Select the Form 12BB Approval section on the sidebar of the page under section Declaration settings while being on the accounts role.
– Step 2: A list of 12BB declaration statuses, employee wise will be visible.
– Step 3: Accountants Have multiple action options.
- View File ( If signed copy submitted by employee )
- View Details ( Employee Declaration form will open & editable if needed )
- Send a Reminder to the employee
Payroll Transactions
The Payroll Transactions section of the Accounts Role – Payroll User Guide provides accountants with a structured approach to managing various payroll-related actions. This section covers critical tasks such as updating payable days, handling deductions, processing additional pay, managing TDS, holding or releasing salaries, and generating payroll reports. With detailed step-by-step instructions, users can efficiently execute payroll operations, ensure accurate salary disbursements, and maintain compliance with financial regulations. By leveraging these functionalities, accountants can streamline payroll processing, minimize errors, and enhance overall payroll management efficiency.
Payable days
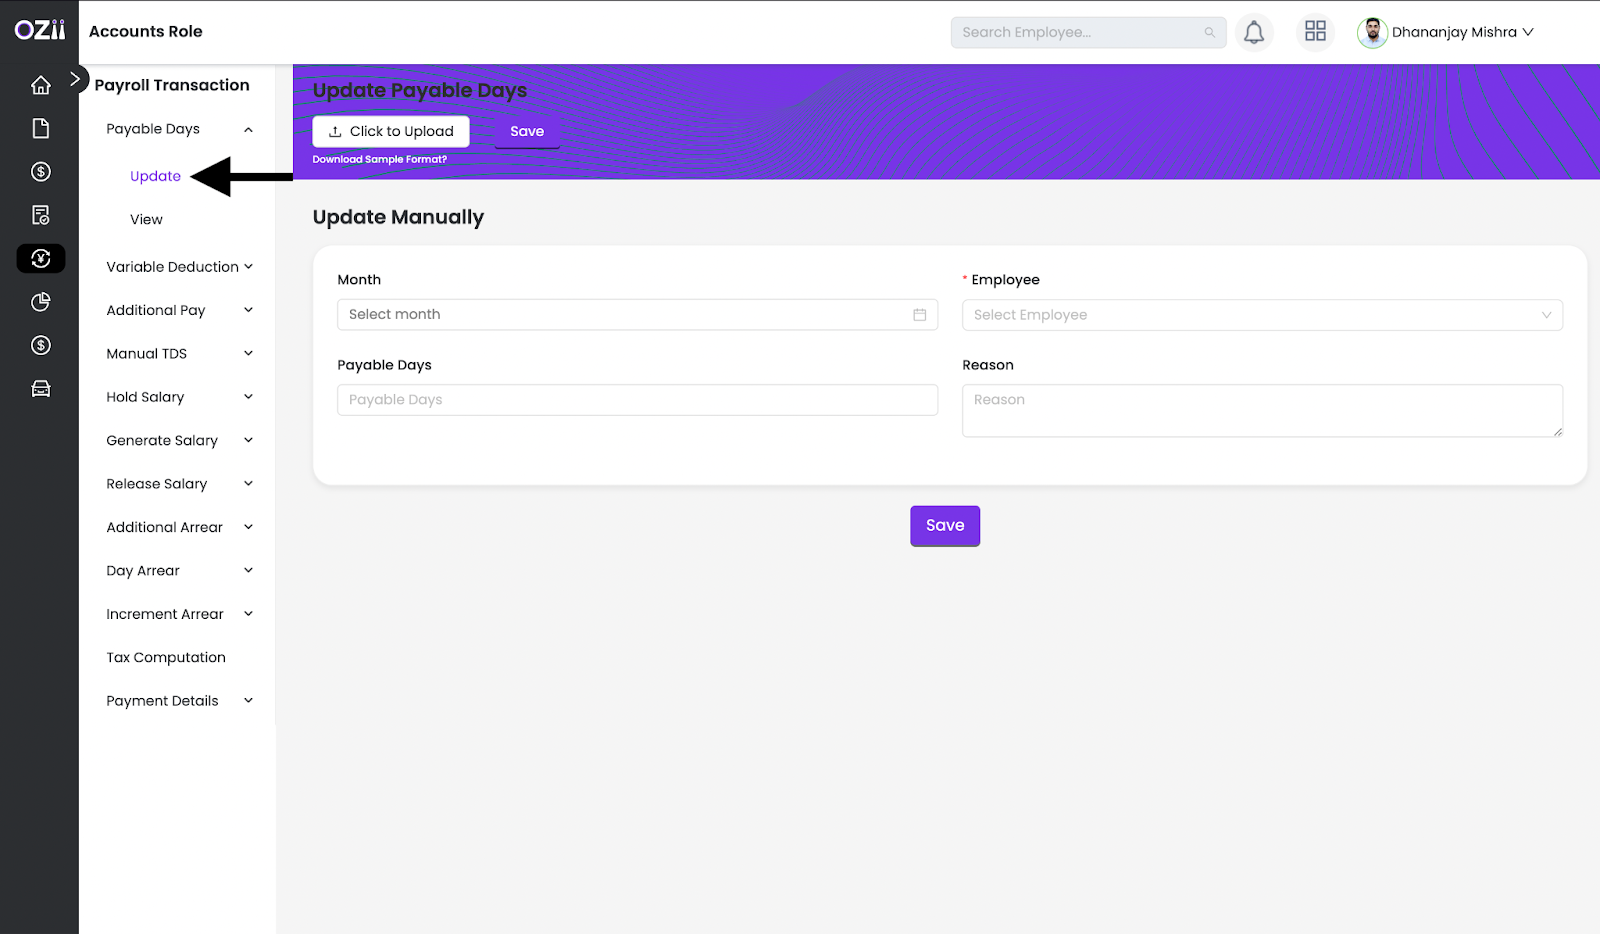
Update ( manually )
– Step 1: Locate & Select the Update section on the sidebar of the page under the subsection payable days under the section payroll Transactions, while being on the accounts role.
– Step 2: The option to upload is available, with a downloadable sample format.
– Step 3: Enter the following details on the form:
- Select The Month
- Select the employee
- Specify payable days
- Mention reason for doing so.
– Step 4: Once all details are finalized, the Accountant can click on save to save the payable days. All the saved payable days can be seen on the View page. The option to edit/delete is available
Variable deduction
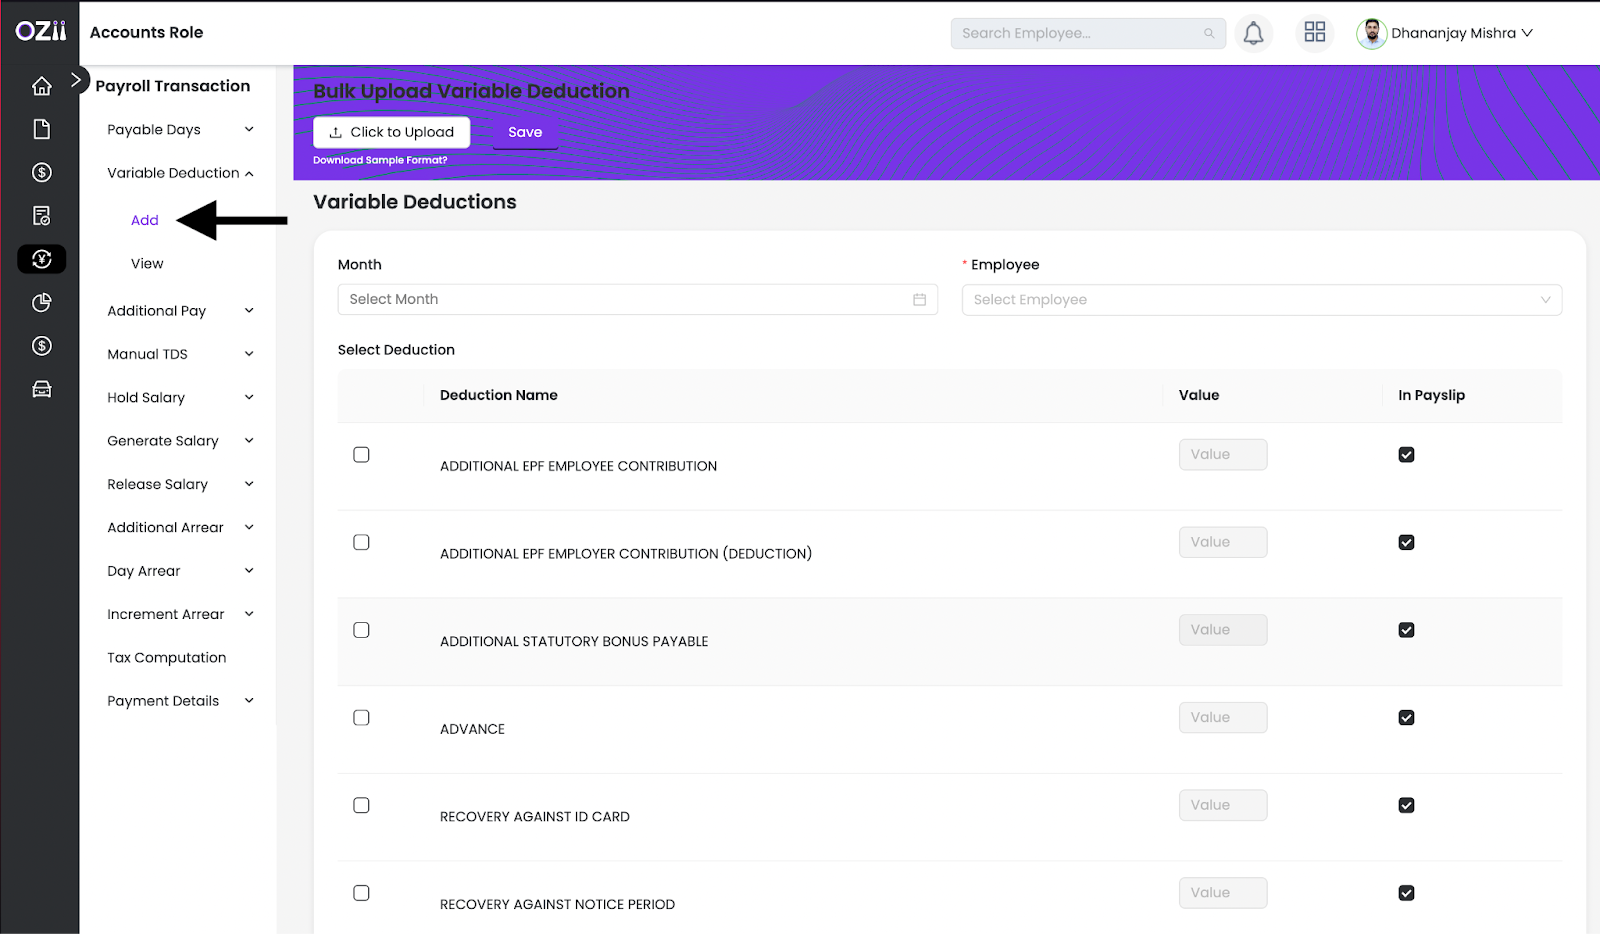
Add
– Step 1: Locate & Select the Add section on the sidebar of the page under the subsection Variable deduction under the section payroll Transactions, while being on the accounts role.
– Step 2: The option to upload is available, with a downloadable sample format.
– Step 3: Enter the following details on the form:
- Select The Month
- Select the employee
- Checkboxes in the list of deductions are available
- Enter value in selected deductions
- Checkbox to show in pay slip is available
- Mention notes for doing so.
– Step 4: Once all details are finalized, the Accountant can click on save to save the Variable deductions. All the saved variable deductions can be seen on the View page. The option to view & edit/delete is available
Additional Pay
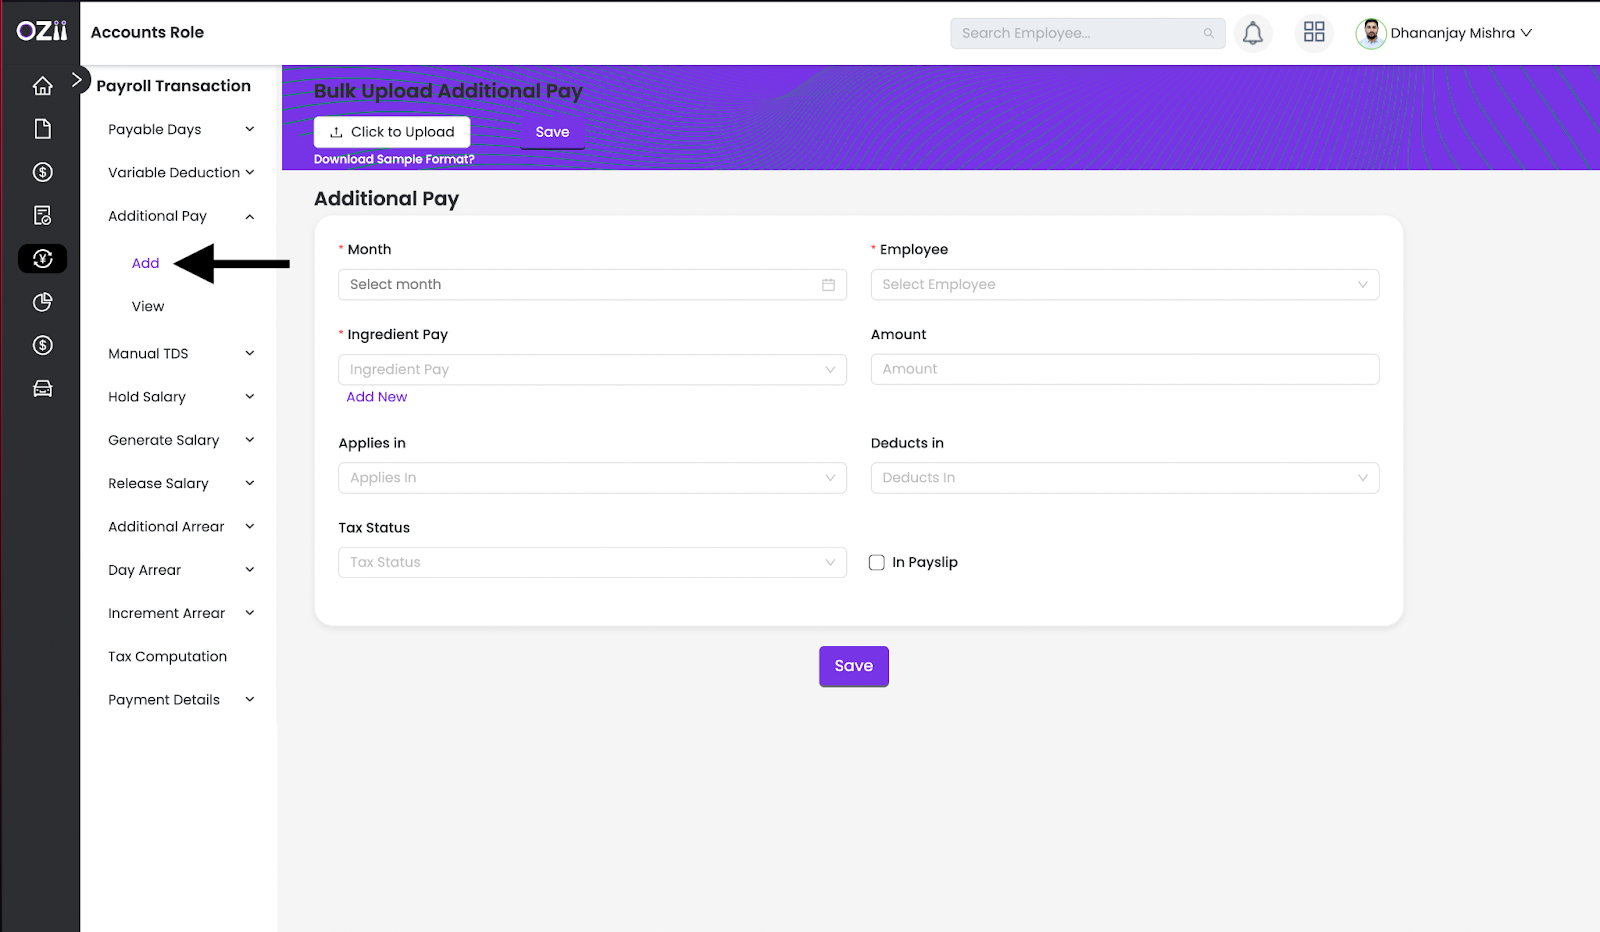
Add
– Step 1: Locate & Select the Add section on the sidebar of the page under the subsection Additional pay under the section payroll Transactions, while being on the accounts role.
– Step 2: The option to upload is available, with a downloadable sample format.
– Step 3: Enter the following details on the form:
- Select The Month
- Select the employee
- Select Ingredient pay
- Specify amount
- Select Applies in
- Select deducts in
- Select tax status
- Checkbox to show in pay slip is available
– Step 4: Once all details are finalized, the Accountant can click on save to save the Additional pay. All the saved Additional pay can be seen on the View page. The option to edit/delete is available
Manual TDS
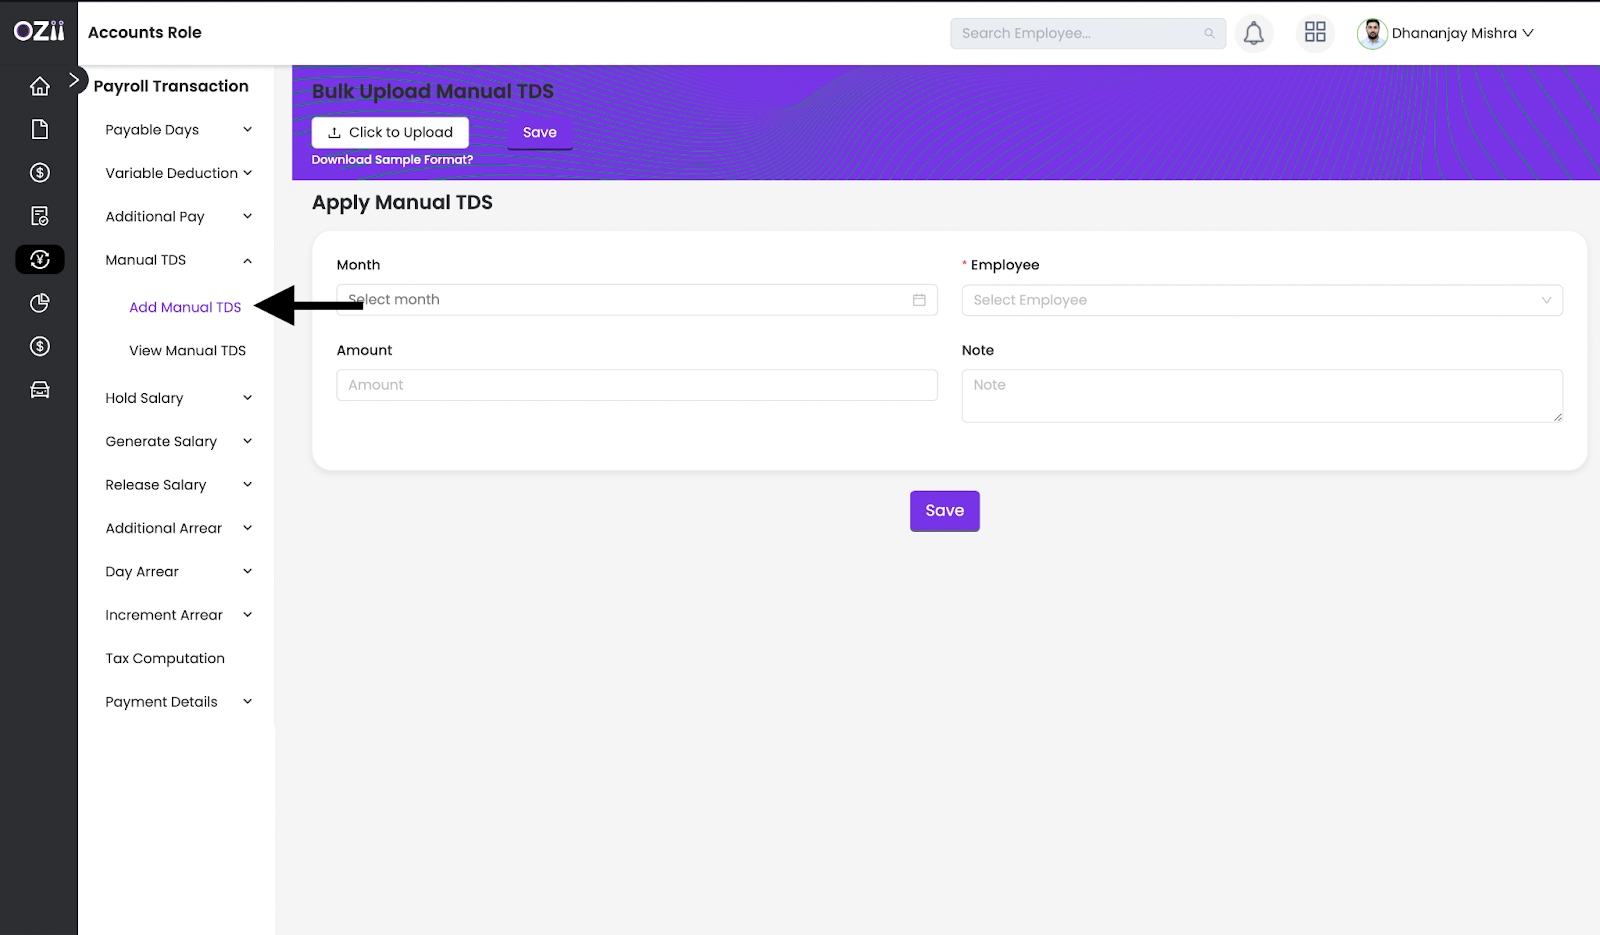
Add Manual TDS
– Step 1: Locate & Select the Add Manual TDS section on the sidebar of the page under the subsection Manual TDS under the section payroll Transactions, while being on the accounts role.
– Step 2: The option to upload is available, with a downloadable sample format.
– Step 3: Enter the following details on the form:
- Select The Month
- Select the employee
- Specify amount
- Mention Note for doing so
– Step 4: Once all details are finalized, the Accountant can click on save to save the Manual TDS. All the saved Manual TDS can be seen on the View Manual TDS page. The option to edit/delete is available
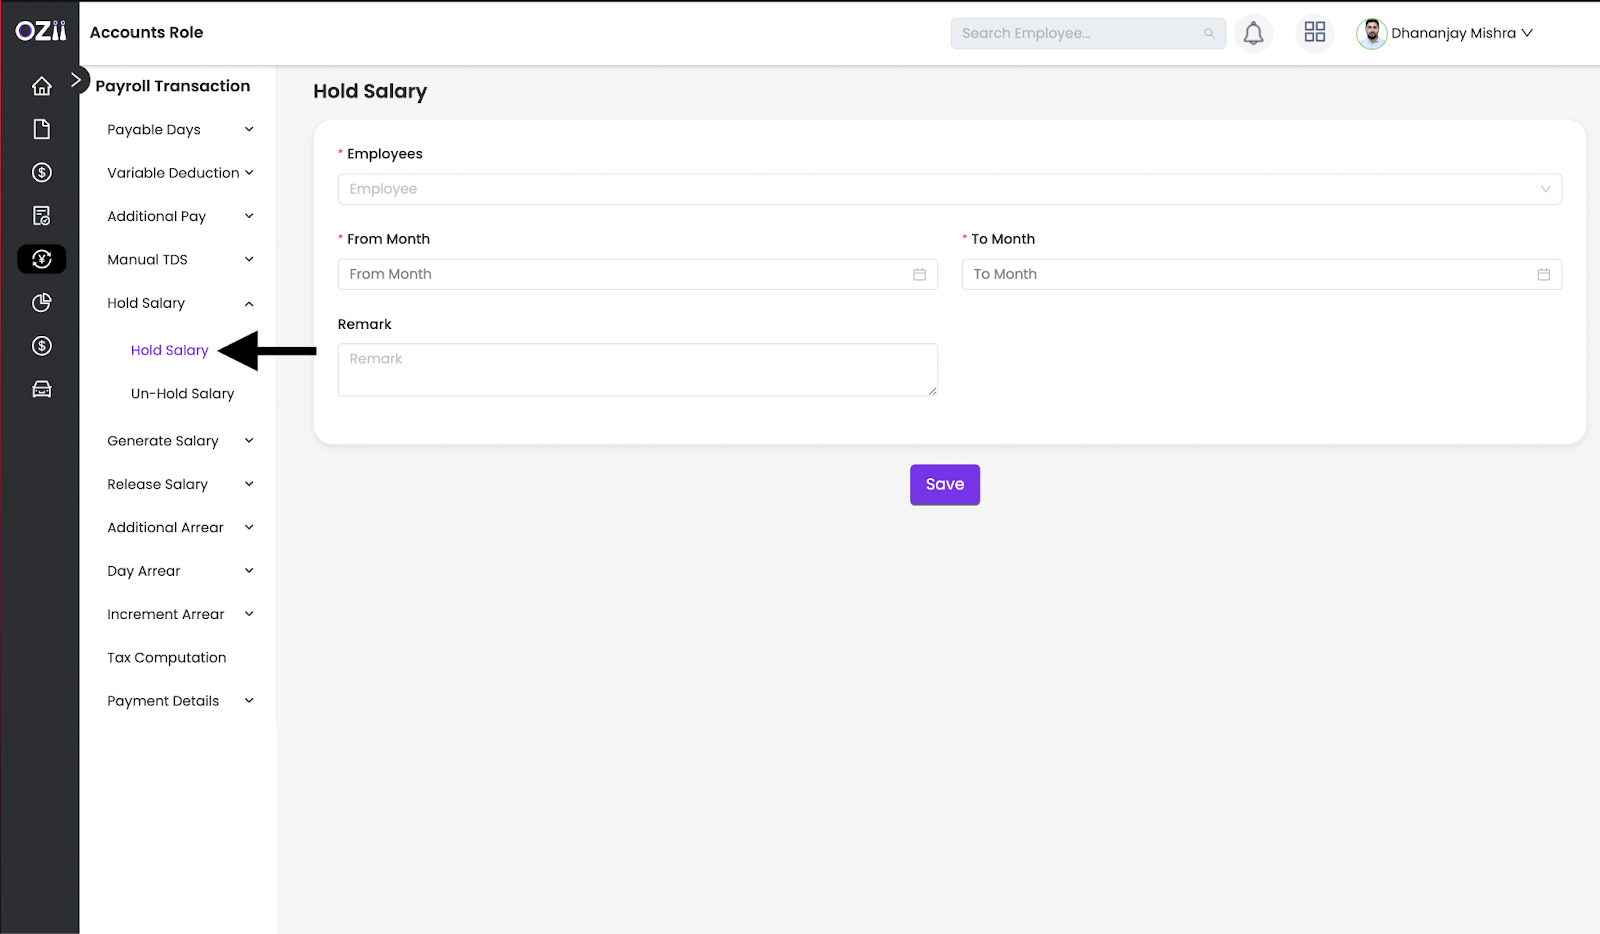
Hold Salary
Hold Salary
– Step 1: Locate & Select the Hold Salary section on the sidebar of the page under the subsection Hold Salary under the section payroll Transactions, while being on the accounts role.
– Step 2: Enter the following details on the form:
- Select the employee
- Specify From Month
- Specify End Month
- Mention Remarks for doing so
– Step 3: Once all details are finalized, the Accountant can click on save to save the Additional pay. All the saved Additional pay can be seen on the Unhold Salary page. The option to unhold is available.
Generate Salary
Generate salary
– Step 1: Locate & Select the Generate Salary section on the sidebar of the page under the subsection Generate Salary under the section Payroll Transactions while being on the accounts role.
– Step 2: A Table showing A list of employees will be shown which can be filtered by employees, dates, etc. The option to generate salary is available.
– Step 4: Once generate the particular generated salary can be seen on the Generated Salary page. The option to Revert is available
Release Salary
Release salary
– Step 1: Locate & Select the Release salary section on the sidebar of the page under the subsection Release salary under the section Payroll Transactions while being on the accounts role.
– Step 2: A Table showing A list of employees will be shown which can be filtered by employees, dates, etc. The option to Release salary is available.
– Step 4: Once generate the particular generated salary can be seen on the Release salary page. The option to Revert is available
Additional Arrear
Add Additional Arrear
– Step 1: Locate & Select the Add section on the sidebar of the page under the subsection Additional Arrear under the section payroll Transactions, while being on the accounts role.
– Step 2: The option to upload is available, with a downloadable sample format.
– Step 3: Enter the following details on the form:
- Select The Month
- Select the employee
- Specify amount
– Step 4: Once all details are finalized, the Accountant can click on save to save the Additional Additonal arrear. All the saved Additional arrears can be seen on the View Manual TDS page. The option to edit/delete is available

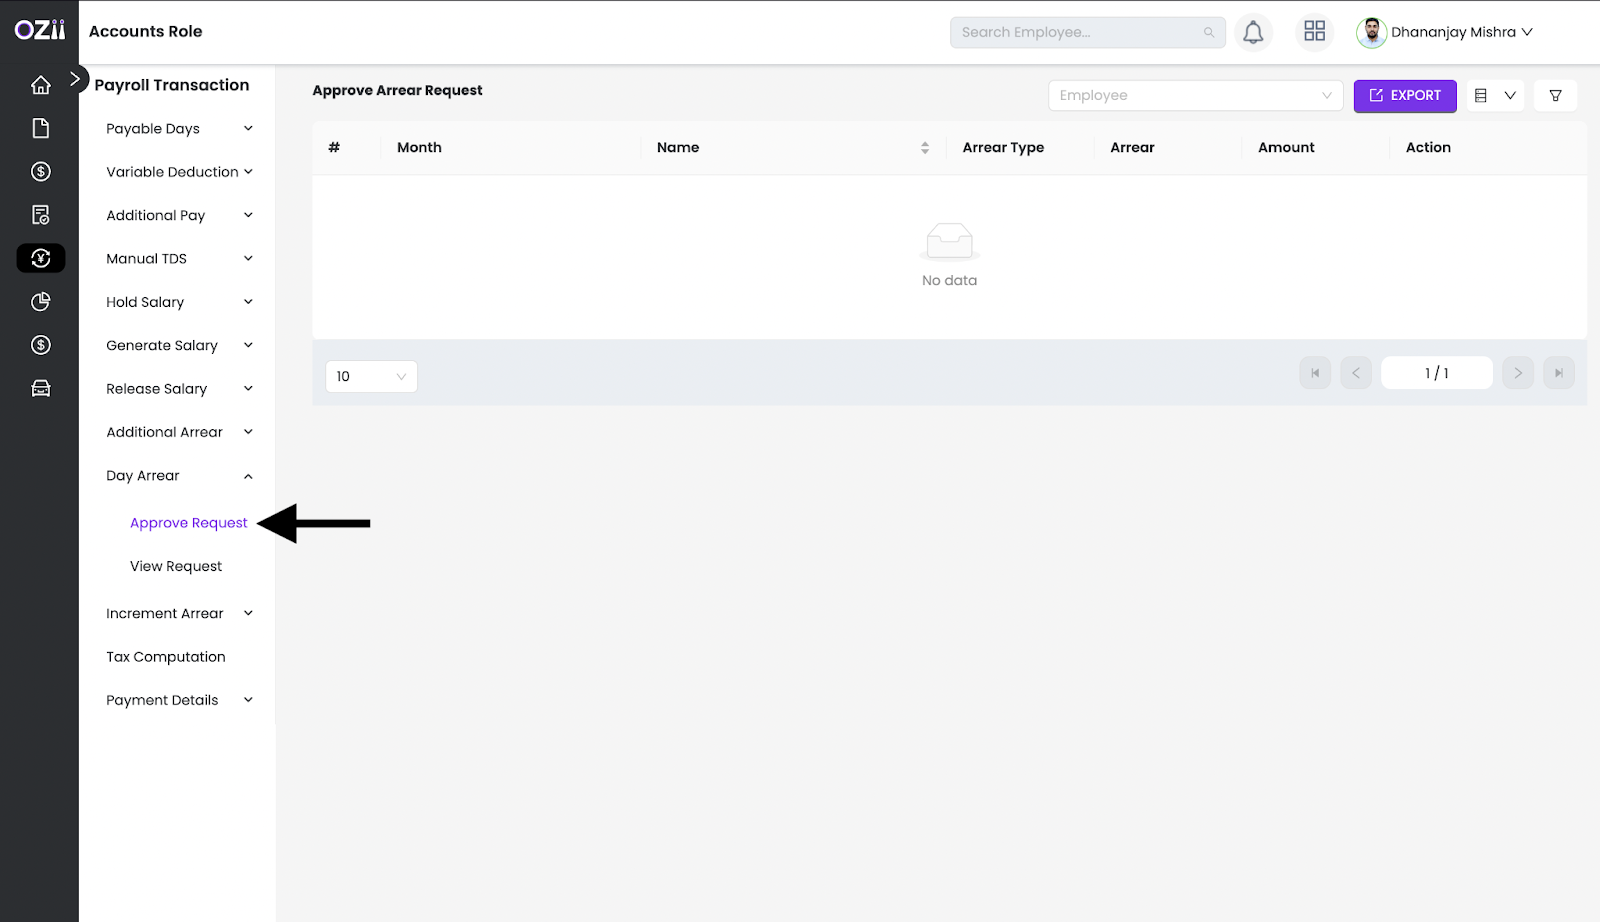
Day Arrears
– Step 1: Locate & Select the Approve request section on the sidebar of the page under the subsection day arrears, under the section pay roll transaction while being on the accounts role.
– Step 2: The Accountant can approve or reject any particular pending day arrears request on the listed page.
All the approved no-dues statuses can be seen on the View Request page.
Increment Arrears
– Step 1: Locate & Select the Approve request section on the sidebar of the page under the subsection Increment arrears, under the section pay roll transaction while being on the accounts role.
– Step 2: The Accountant can approve or reject any particular pending Increment arrears request on the listed page.
All the approved no-dues statuses can be seen on the View Request page.
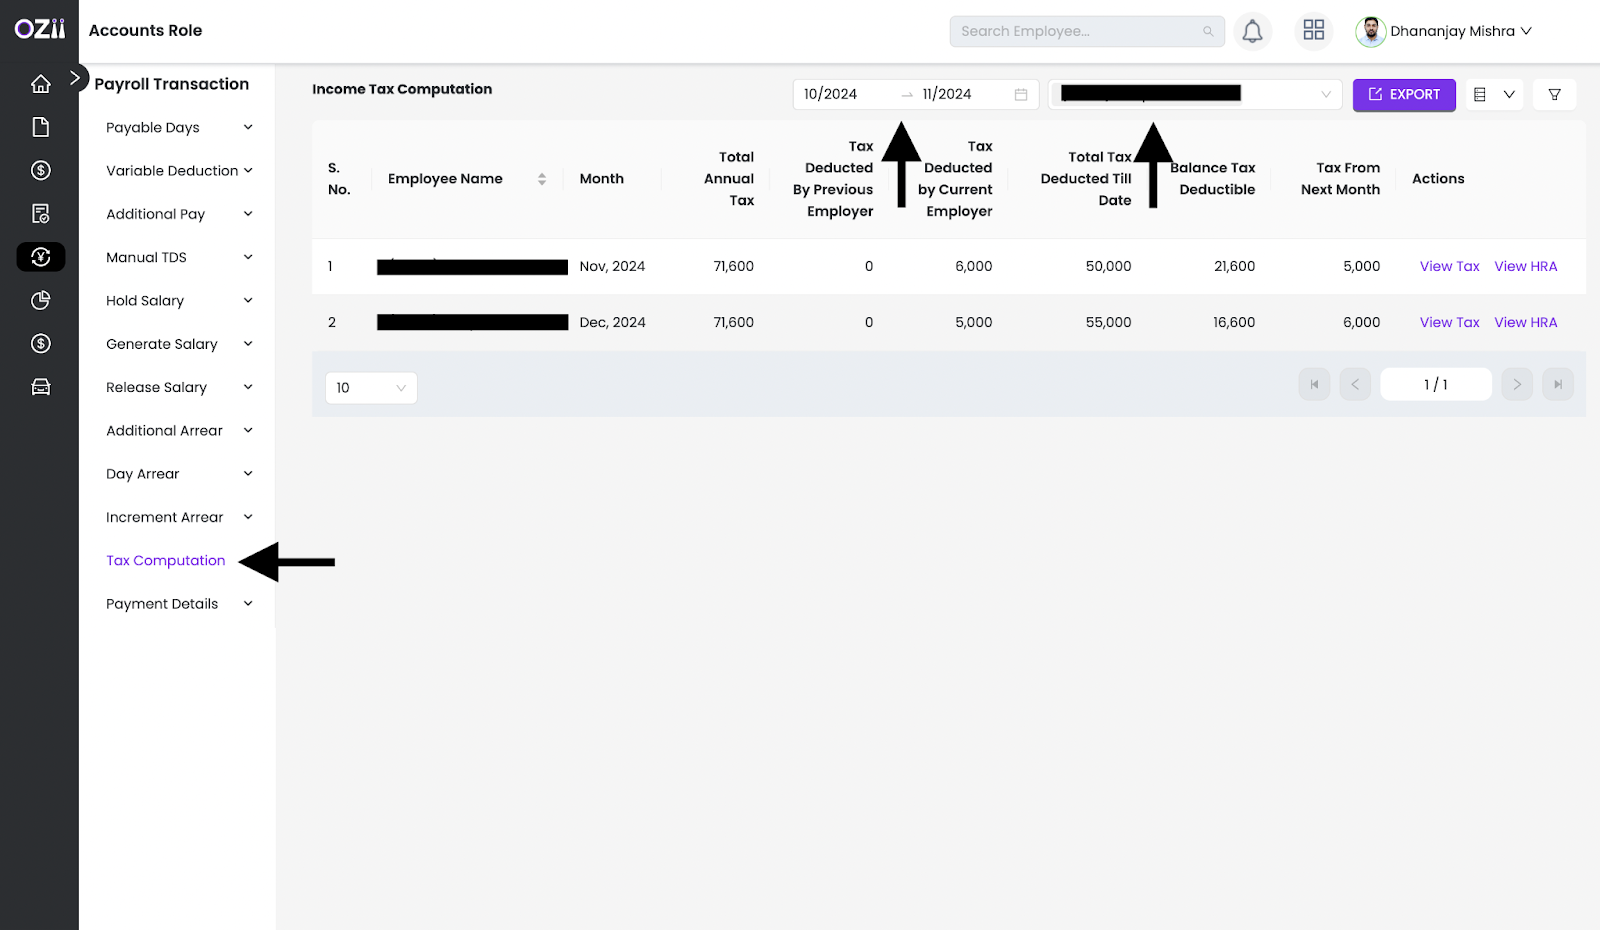
Tax Computation
– Step 1: Locate & Select the Tax Computation section on the sidebar of the page under the section pay roll transaction while being on the accounts role.
– Step 2: A Table showing A list of employees will be shown which can be filtered by employees, dates, etc. The option to View Tax 7 View HRA is available.
Payment details
Add TDS
– Step 1: Locate & Select the Add TDS section on the sidebar of the page under the subsection Payment detials under the section payroll Transactions, while being on the accounts role.
– Step 2: The option to upload is available, with a downloadable sample format.
– Step 3: Enter the following details on the form:
- Select The Month
- Select the employee
– Step 4: Once all details are finalized, the Accountant can click on save to save the TDS. All the saved TDS can be seen on the View Filed TDS page. The option to edit/delete is available
Add Pay
– Step 1: Locate & Select the Add Pay section on the sidebar of the page under the subsection Payment detials under the section payroll Transactions, while being on the accounts role.

– Step 2: The option to upload is available, with a downloadable sample format.
– Step 3: Enter the following details on the form:
- Select The Month
- Select the employee
– Step 4: Once all details are finalized, the Accountant can click on save to save the Pay. All the saved Pay can be seen on the View Pay page. The option to edit/delete is available
Add EPF
– Step 1: Locate & Select the Add EPF section on the sidebar of the page under the subsection Payment detials under the section payroll Transactions, while being on the accounts role.
– Step 2: The option to upload is available, with a downloadable sample format.
– Step 3: Enter the following details on the form:
- Select The Month
- Select the employee
– Step 4: Once all details are finalized, the Accountant can click on save to save the EPF. All the saved EPF can be seen on the View EPF page. The option to edit/delete is available
Add ESIC
– Step 1: Locate & Select the Add ESIC section on the sidebar of the page under the subsection Payment detials under the section payroll Transactions, while being on the accounts role.
– Step 2: The option to upload is available, with a downloadable sample format.
– Step 3: Enter the following details on the form:
- Select The Month
- Select the employee
– Step 4: Once all details are finalized, the Accountant can click on save to save the ESIC. All the saved ESIC can be seen on the View ESIC page. The option to edit/delete is available
Add Bonus
– Step 1: Locate & Select the Add Bonus section on the sidebar of the page under the subsection Payment detials under the section payroll Transactions, while being on the accounts role.
– Step 2: The option to upload is available, with a downloadable sample format.
– Step 3: Enter the following details on the form:
- Select The Month
- Select the employee
– Step 4: Once all details are finalized, the Accountant can click on save to save the Bonus. All the saved Bonuses can be seen on the View Bonus page. The option to edit/delete is available
Reports
The Reports section of the Accounts Role – Payroll User Guide enables accountants to generate, view, and analyze detailed payroll-related reports for better financial oversight. This section covers key report categories, including deductions, salary details, expenses, attendance summaries, and employee bank details. With step-by-step guidance, users can filter, export, and review crucial payroll data to ensure accuracy, compliance, and transparency. By utilizing these reporting tools, accountants can track payroll performance, monitor financial trends, and support informed decision-making within the organization.
Deductions
PF Contributions
– Step 1: Locate & Select the PF contributions section on the sidebar of the page under the subsection deductions under the section Reports, while being on the accounts role.
– Step 2: A Table showing PF contribution reports is displayed, Report can be filtered employees, dates, etc. Option to export is also available.
ESIC Contributions
– Step 1: Locate & Select the ESIC contributions section on the sidebar of the page under the subsection deductions under the section Reports, while being on the accounts role.
– Step 2: A Table showing ESIC contribution reports is displayed, Report can be filtered employees, dates, etc. Option to export is also available.
EPF Admin Charges
– Step 1: Locate & Select the EPF Admin Charges section on the sidebar of the page under the subsection deductions under the section Reports, while being on the accounts role.
– Step 2: A Table showing EPF Admin Charges reports is displayed, Report can be filtered employees, dates, etc. Option to export is also available.
Salary
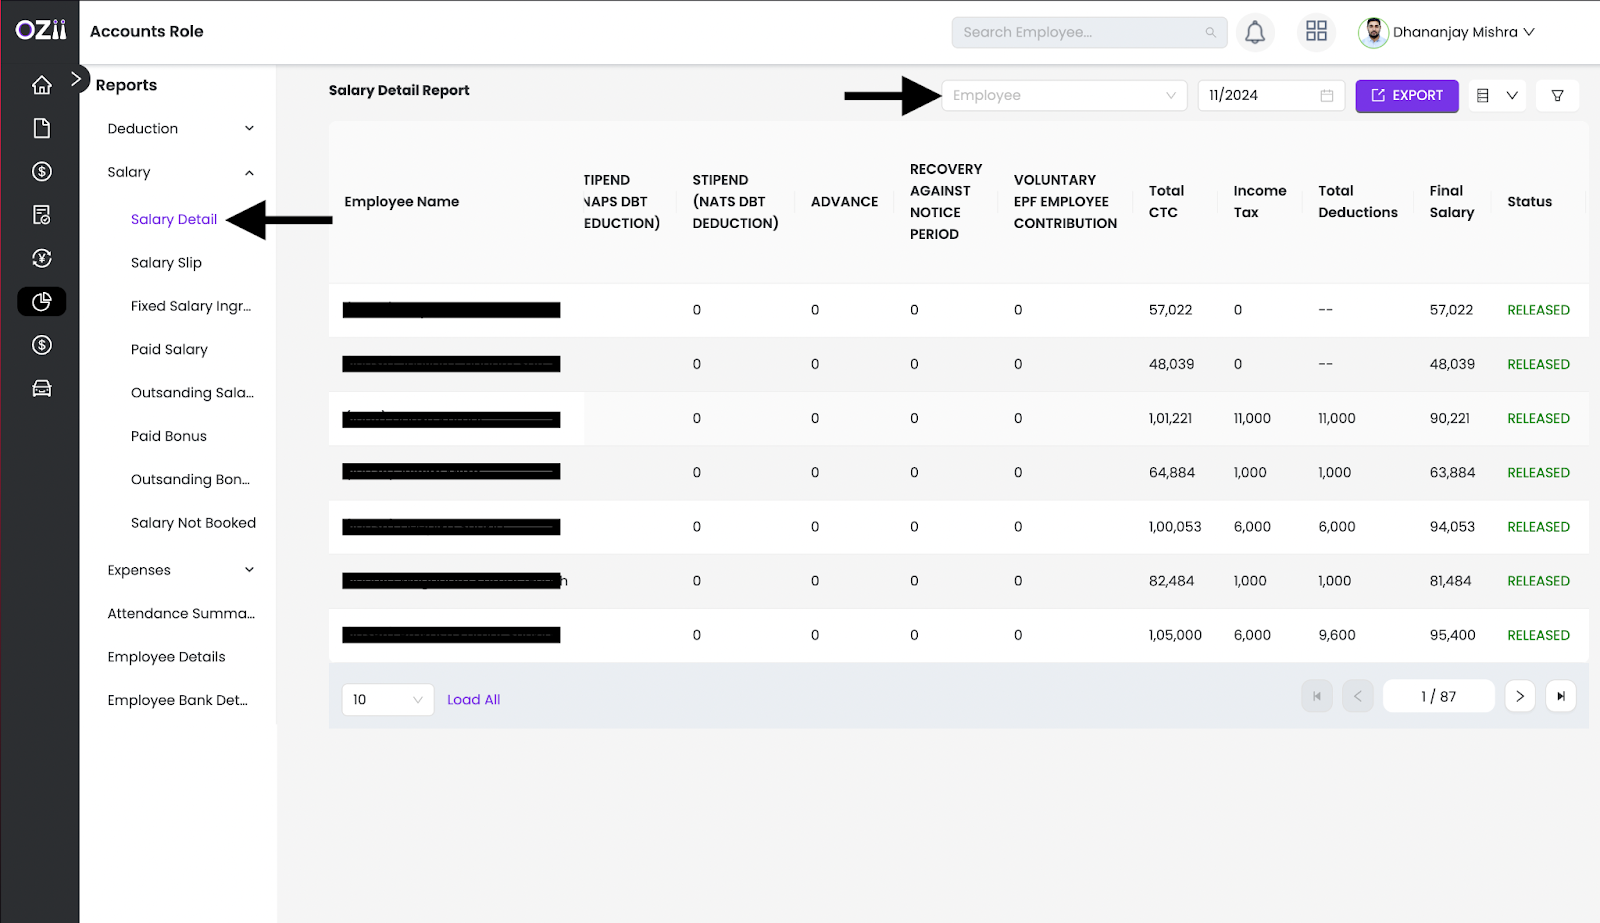
Salary Details
– Step 1: Locate & Select the Salary Details section on the sidebar of the page under the subsection Salary under the section Reports, while being on the accounts role.
– Step 2: A Table showing Salary Details reports is displayed, Report can be filtered employees, dates, etc. Option to export is also available.
Salary Slips
– Step 1: Locate & Select the Salary Slips section on the sidebar of the page under the subsection Salary under the section Reports, while being on the accounts role.
– Step 2: A Table showing Salary Slips is displayed, which can be filtered employees, dates, etc. Option to export is also available.

Fixed Salary Ingredients
– Step 1: Locate & Select the Fixed Salary Ingredientssection on the sidebar of the page under the subsection Salary under the section Reports, while being on the accounts role.
– Step 2: A Table showing Fixed Salary Ingredients reports is displayed, Report can be filtered employees, dates, etc. Option to export is also available.
Paid Salary
– Step 1: Locate & Select the Paid Salary section on the sidebar of the page under the subsection Salary under the section Reports, while being on the accounts role.
– Step 2: A Table showing Fixed Paid Salary reports is displayed, Report can be filtered employees, dates, etc. Option to export is also available.
Outstanding Salary report
– Step 1: Locate & Select the Outstanding Salary report section on the sidebar of the page under the subsection Salary under the section Reports, while being on the accounts role.
– Step 2: A Table showing Fixed Outstanding Salary reports is displayed, Report can be filtered employees, dates, etc. Option to export is also available.
Paid Bonus
– Step 1: Locate & Select the Paid Bonus section on the sidebar of the page under the subsection Salary under the section Reports, while being on the accounts role.
– Step 2: A Table showing Fixed Paid Bonus reports is displayed, Report can be filtered employees, dates, etc. Option to export is also available.
Outstanding Bonus
– Step 1: Locate & Select the Outstanding Bonus section on the sidebar of the page under the subsection Salary under the section Reports, while being on the accounts role.
– Step 2: A Table showing Fixed Outstanding Bonus reports is displayed, Report can be filtered employees, dates, etc. Option to export is also available.
Salary not booked
– Step 1: Locate & Select the Salary not booked section on the sidebar of the page under the subsection Salary under the section Reports, while being on the accounts role.
– Step 2: A Table showing Fixed Salary not booked reports is displayed, Report can be filtered employees, dates, etc. Option to export is also available.
Expenses
Taxable Salary
– Step 1: Locate & Select the Taxable salary section on the sidebar of the page under the subsection Expenses under the section Reports, while being on the accounts role.
– Step 2: A Table showing Taxable salary reports is displayed, Report can be filtered employees, dates, etc. Option to export is also available.
Employer EPF Expenses
– Step 1: Locate & Select the Employer EPF Expenses section on the sidebar of the page under the subsection Expenses under the section Reports, while being on the accounts role.
– Step 2: A Table showing Employer EPF Expenses reports is displayed, Report can be filtered employees, dates, etc. Option to export is also available.
Employer ESIC Expenses
– Step 1: Locate & Select the Employer ESIC Expenses section on the sidebar of the page under the subsection Expenses under the section Reports, while being on the accounts role.
– Step 2: A Table showing Employer ESIC Expenses reports is displayed, Report can be filtered employees, dates, etc. Option to export is also available.
Project Wise salary Expenses
– Step 1: Locate & Select the Project Wise salary Expenses section on the sidebar of the page under the subsection Expenses under the section Reports, while being on the accounts role.
– Step 2: A Table showing Project Wise salary Expenses reports is displayed, Report can be filtered employees, dates, etc. Option to export is also available.
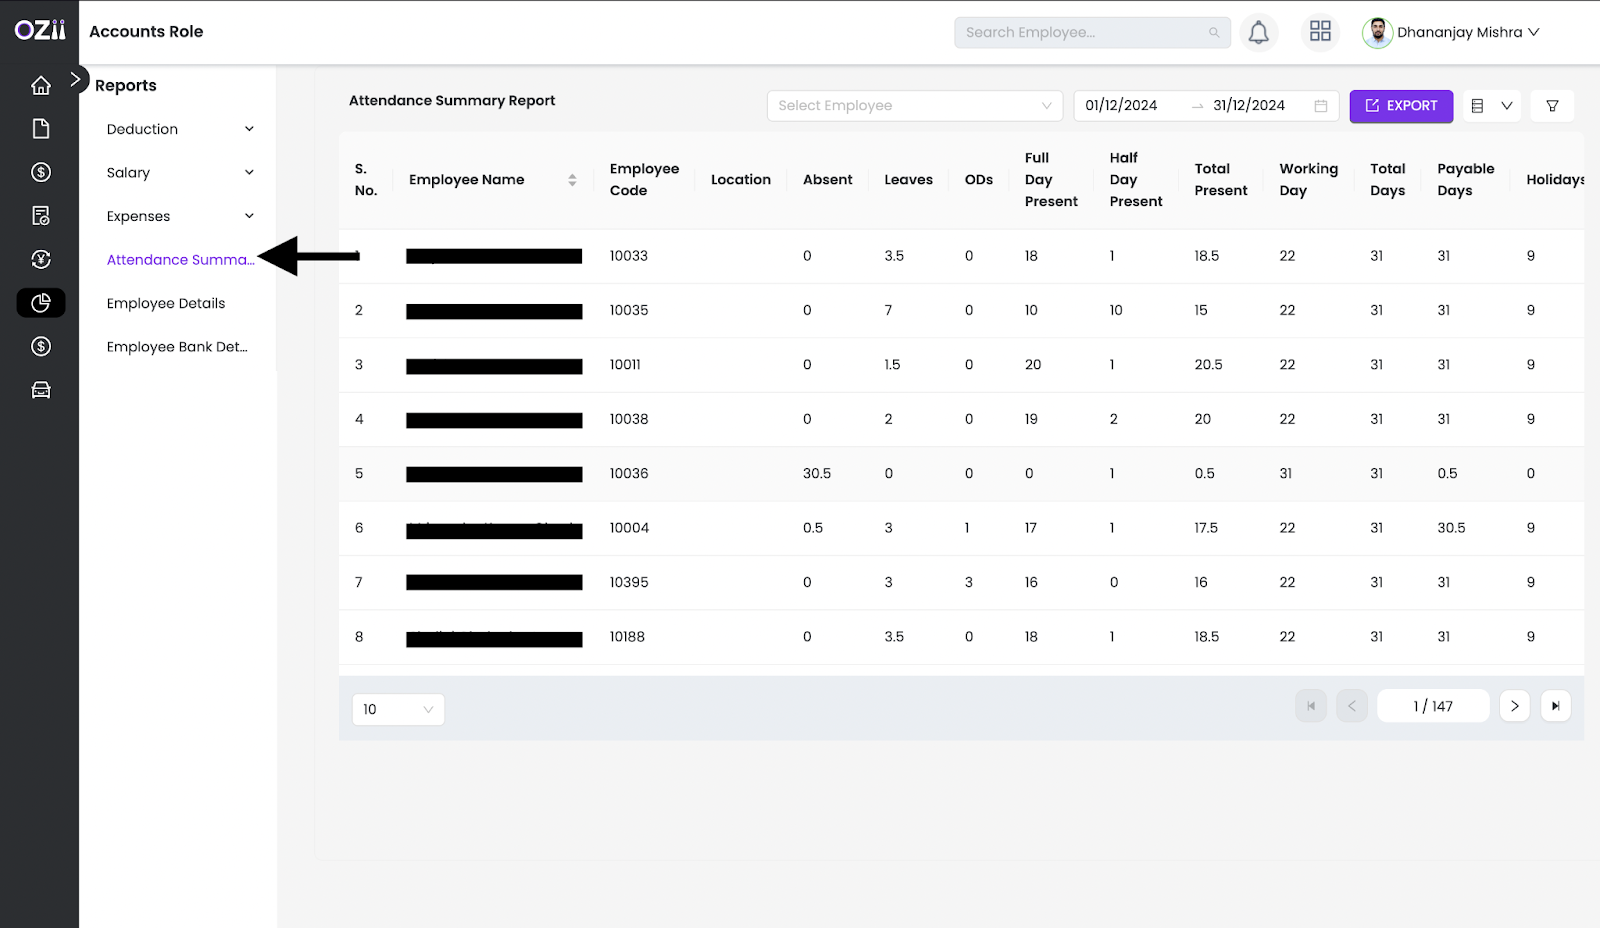
Attendance Summary
– Step 1: Locate & Select the Attendance Summary section on the sidebar of the page under the section Reports, while being on the accounts role.
– Step 2: A Table showing Attendance Summary reports is displayed, Report can be filtered employees, dates, etc. Option to export is also available.
Employee details
– Step 1: Locate & Select the Employee details section on the sidebar of the page under the section Reports, while being on the accounts role.
– Step 2: A Table showing Employee details reports is displayed, Report can be filtered employees, dates, etc. Option to export is also available.
Employee Bank details
– Step 1: Locate & Select the Employee Bank details section on the sidebar of the page under the section Reports, while being on the accounts role.
– Step 2: A Table showing Employee Bank details reports is displayed, Report can be filtered employees, dates, etc. Option to export is also available.
Last modified: February 14, 2025