Welcome to the Task Management – Employee User Guide! This guide is designed to help you navigate and effectively utilize the task management system. Whether you are managing projects, assigning tasks, tracking workflows, or generating reports, this guide provides step-by-step instructions to streamline your work. From accessing the dashboard to configuring workflows and using analytics, you’ll find everything you need to optimize your task management experience. Let’s get started!
Accessing the Dashboard
1. Open your web browser and navigate to the {provided link}
2. Log in to the dashboard using your assigned credentials.
Dashboard Home
1. Upon logging in, you will be directed to the Dashboard Home page.
2. The Dashboard Home page displays an overview of key metrics and quick links to other sections of the dashboard.
3. Review the metrics and click on any quick links to access specific functionalities.
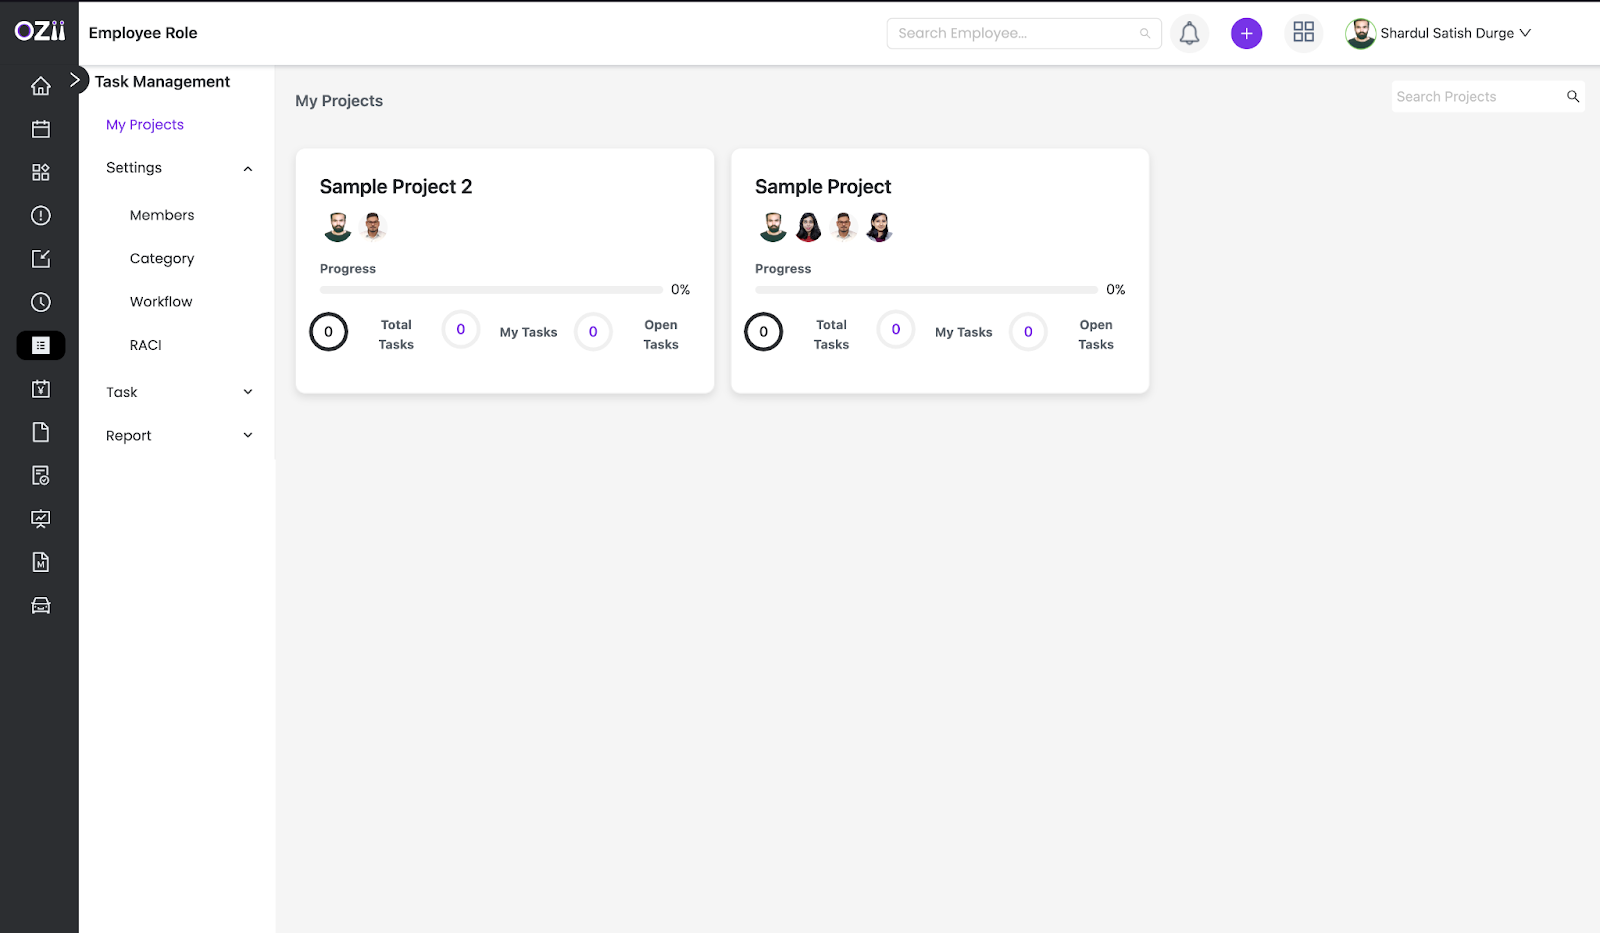
My Project
The My Project section provides employees with an overview of all projects assigned to them. It allows users to easily locate and access project details, track progress, and manage tasks efficiently. With a structured dashboard, employees can navigate between different project settings, collaborate with team members, and stay updated on project developments in real time.
Locate & Select the Task Management section on the main sidebar of the dashboard, While being on the Employee Role. All the projects that are created or assigned to you will be visible on the dashboard.
Project Settings
( Only the Unit Head who creates the project and assigned admins can make changes to project settings )
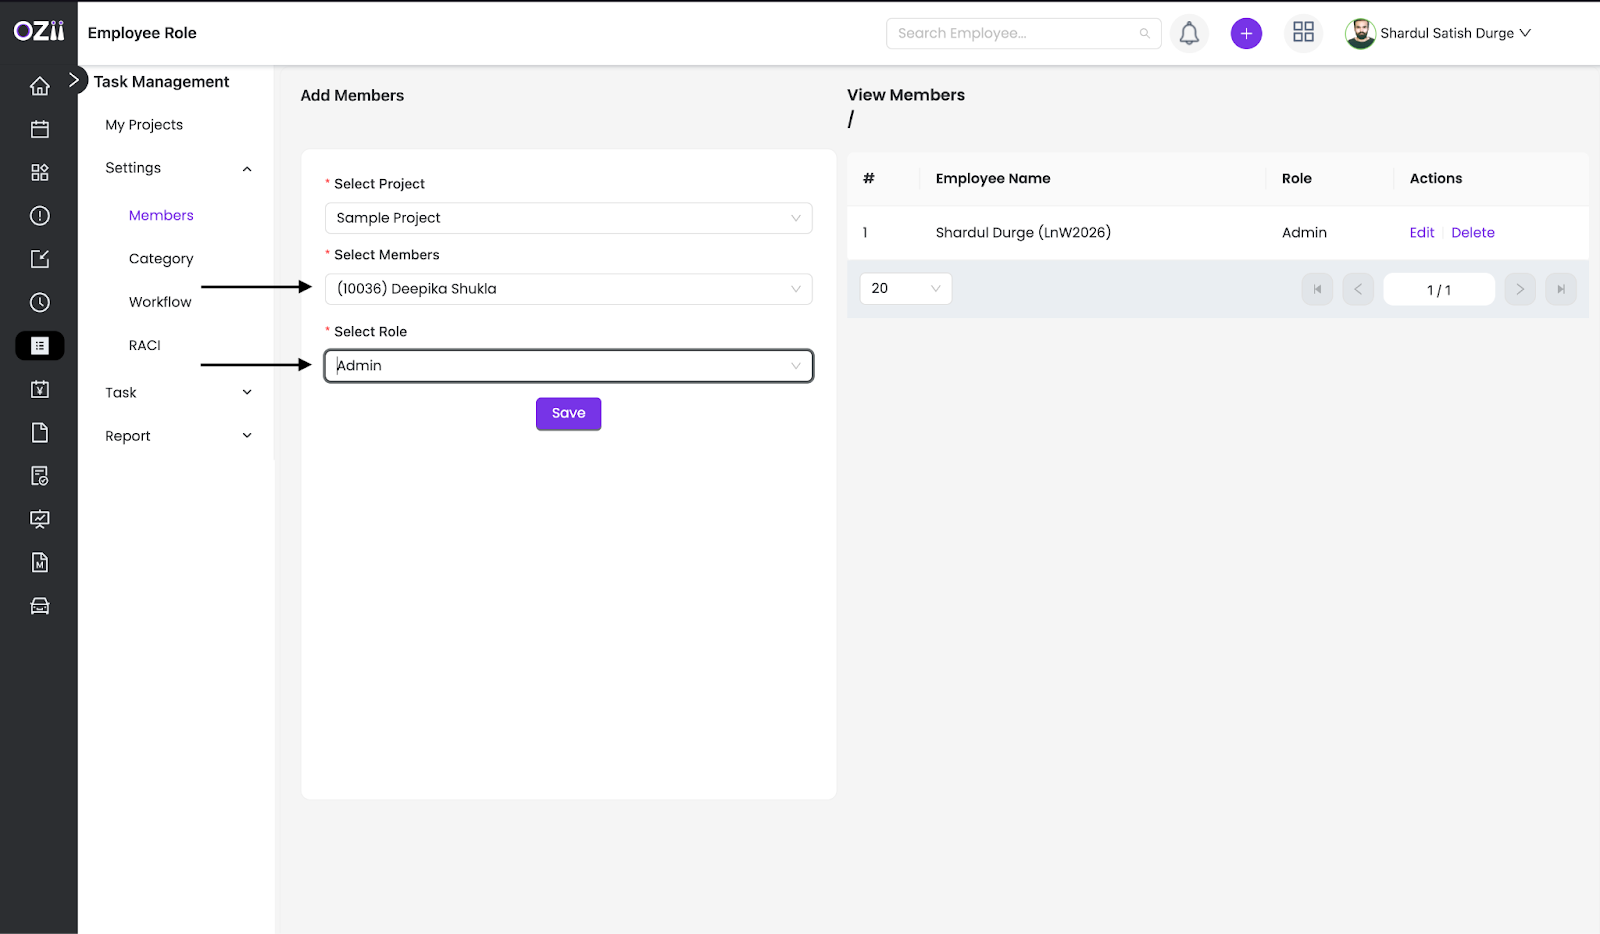
Project Members
– Step 1: Locate & Select the Members section on the page’s sidebar under the Section Settings.
– Step 2: To add a member to a particular project fill in these details:
- Select The Project
- Select The Member ( from the list of employees )
- Select the Role the member will have on the project.
– Step 3: Once all details are finalized, the Employee can click on save to add a member to the particular project. Multiple members can added to the project.
Project Category
– Step 1: Locate & Select the Category section on the page’s sidebar under the Section Settings.
( Project category can be understood as Work types such as Designing, Development, testing, etc. The project category is crucial for the project as the RACI will be defined according to the categories made )
– Step 2: To add a category to a particular project fill in these details
- Select The Project
- Create a Category
– Step 3: Once all details are finalized, the Employee can click on save to add a category to the particular project. Multiple categories can added to the project.

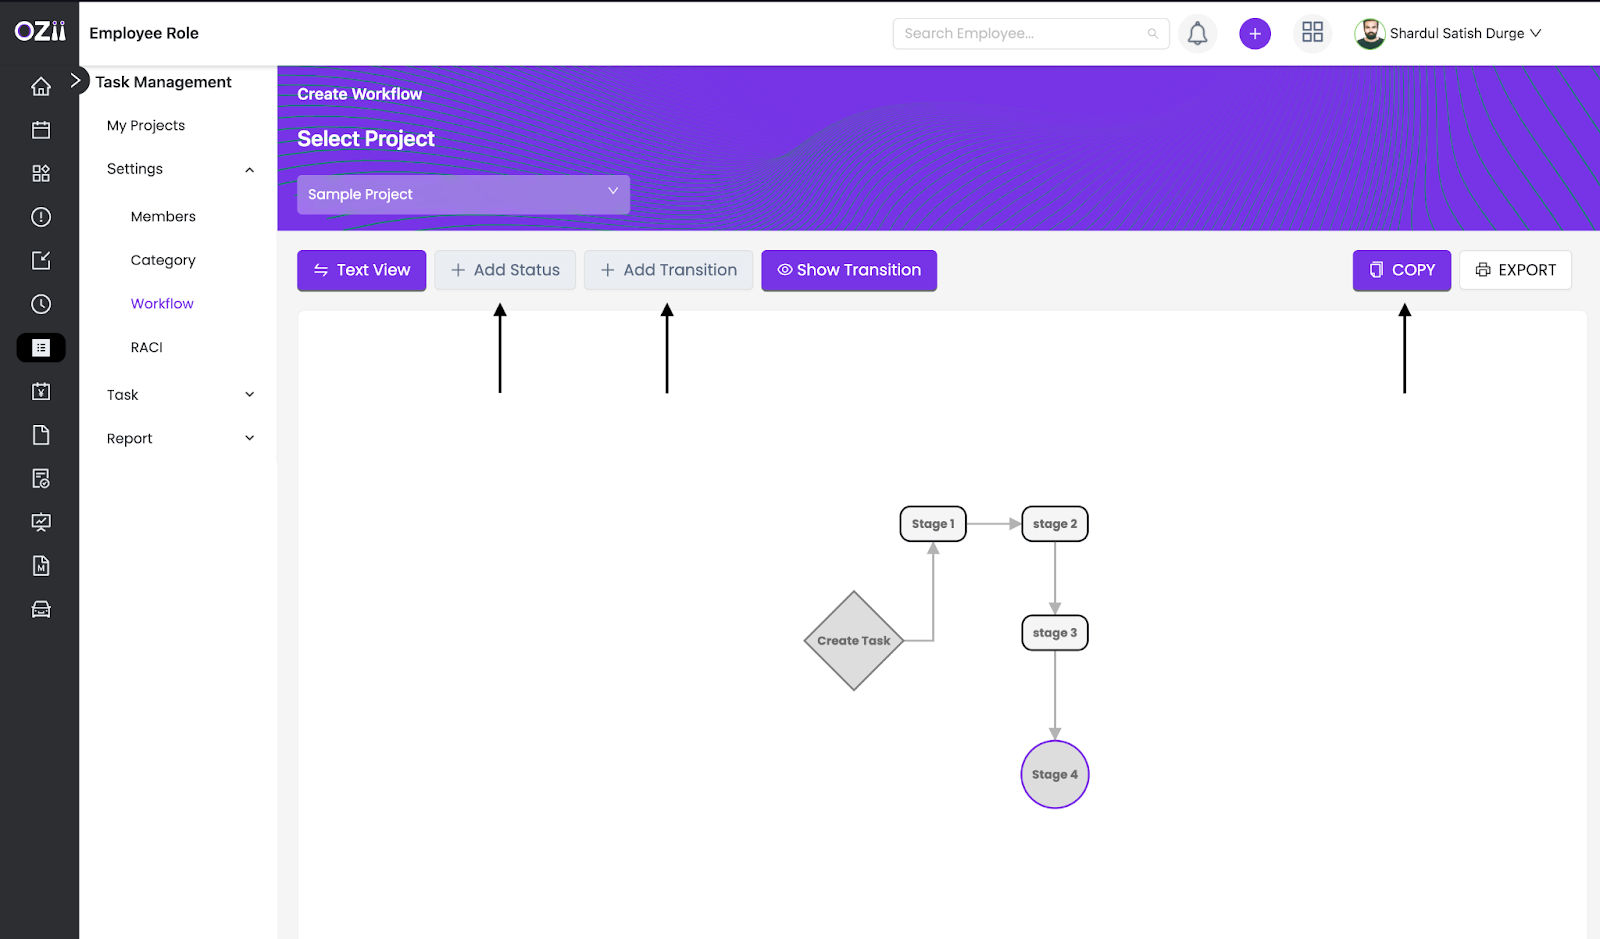
Workflow
The Workflow section helps define and visualize the stages and transitions of tasks within a project. It provides a structured view of task progression through a flowchart or table, ensuring streamlined execution and clear timelines. Employees can create statuses, set transitions, and track progress, with the workflow seamlessly reflected on the project’s Kanban board for better task management.
– Step 1: Locate & Select the Workflow section on the page’s sidebar under the Section Settings.
(Workflow is a flow chart view or a table view of all the particular stages and transitions of tasks executed in the project. Defining workflow helps streamline Tasks & duties executed in the project while giving an overview of the progress and timelines. Workflow will also be reflected on the project’s kanban board )
– Step 2: To add a workflow to a particular project select the specific Project on the workflow dashboard
– Step 2: To add a Project stage or status click on Add Status on the workflow dashboard
– Step 3: To add a status to a particular project fill in these details
- Give Status Name
- Give Status Description
- Specify Status type ( Is Start, None & Is End )
( ‘Is start’ & ‘Is End’ statuses can be only applicable once, all the statuses between start and end can be saved as ‘none’.)
– Step 4: Once all details are finalized, the Employee can click on save to add a status.
– Step 5: To add a Transition between statuses click on Add Transition on the workflow dashboard
– Step 6: To add a transition to a particular project fill in these details
- Give Transition Name
- Give Transition Description
- Select Status/ Step From
- Select Status/ Step To
- A check box for Allowing reverse Transition is also available if applicable.
– Step 7: Once all details are finalized, the Employee can click on save to add a Transition.
Once the workflow is completely defined it will be reflected the same on the Project dashboard in a Kanban view.
Chart View:-
Kanban view:-

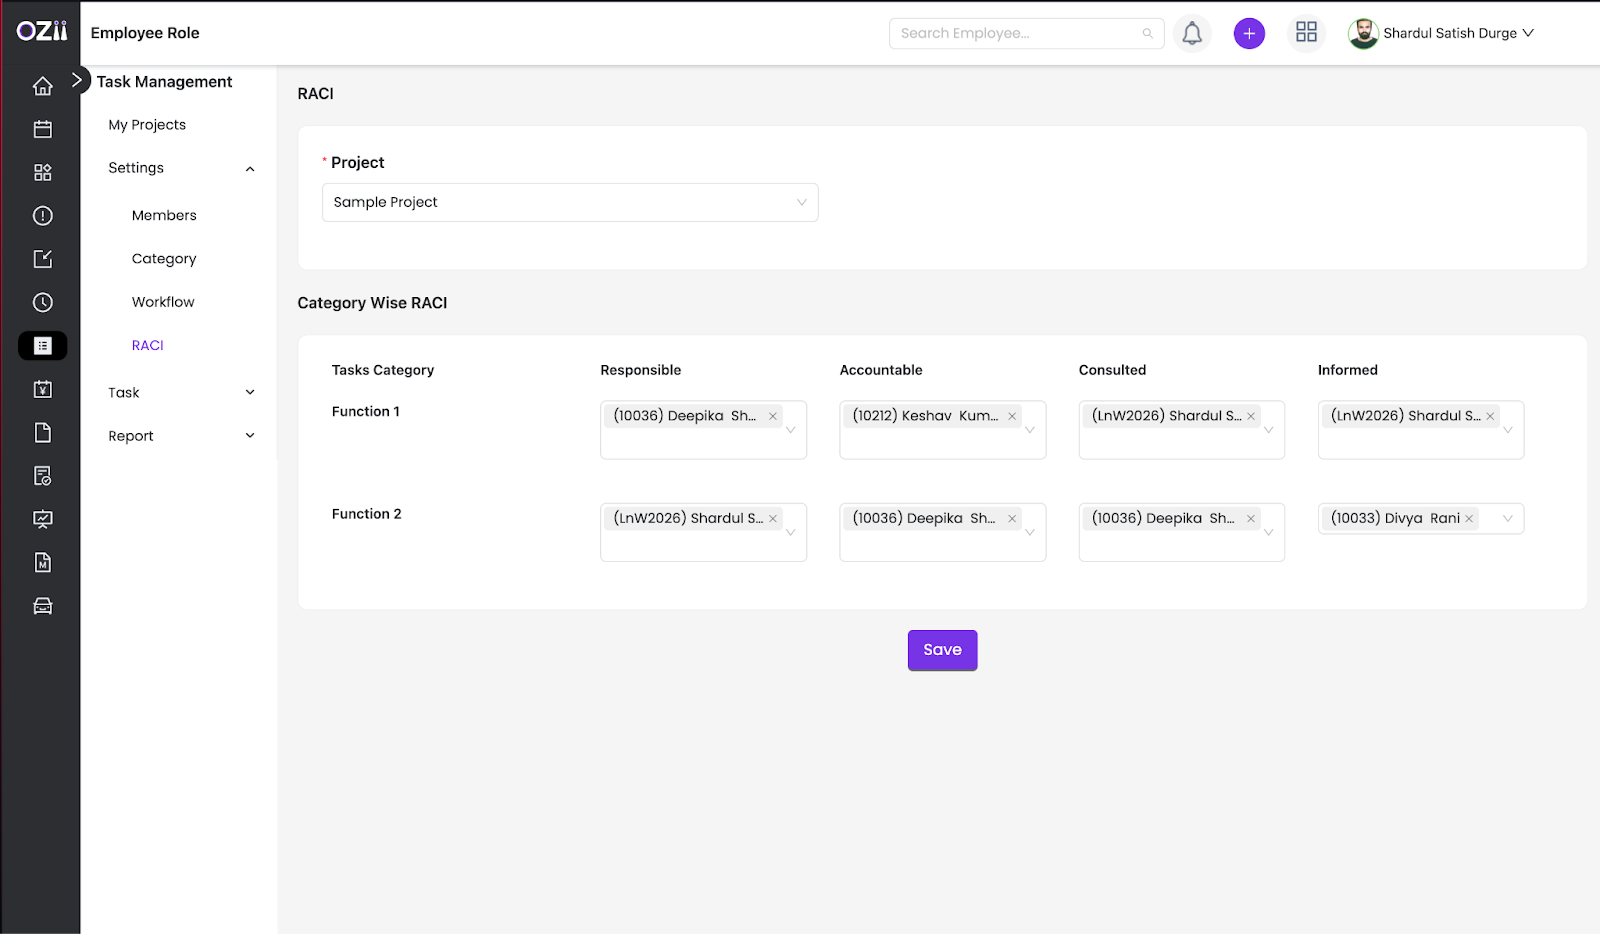
RACI
The RACI section helps define roles and responsibilities within a project using the Responsible, Accountable, Consulted, and Informed framework. It ensures clarity in task ownership by mapping project members to specific work categories. With a structured matrix, employees can efficiently assign roles, track accountability, and generate detailed RACI reports for better project coordination.
– Step 1: Locate & Select the RACI section on the page’s sidebar under the Section Settings.
– Step 2: To add RACI details to a particular project select the specific Project on the workflow dashboard.
A Predefined table will be ready according to the work categories defined earlier. All the categories will be defined on the left column and the RACI Matrix ( Responsible, Accountable, Consulted & Informed ) Will be defined on the top row.
– Step 3: Employees can Add the respective Project Members, to their applicable categories.
Once the tasks are also defined the RACI Reports can be accessible as well.
Checklist
– Step 1: Locate & Select the Checklist section on the page’s sidebar under the Section Settings.
– Step 2: To add Checklist details & templates to a particular project select the specific Project on the workflow dashboard.
– Step 3: Specify the checklist name.
– Step 4: Specify Steps/points on the checklist.
– Step 5: Once all details are finalized, the Employee can click on save to save the particular checklist template, Checklist templates can be imported into any given task & project.
Tasks
The Tasks section allows employees to create, assign, and manage tasks within a project. It provides a structured approach to task organization by defining priorities, deadlines, and assignees. With features like task linking, categorization, and status tracking, employees can efficiently monitor progress and ensure timely task completion.
Add Tasks
The Add Task section enables users to create new tasks by specifying key details such as task name, description, priority, assignee, and deadlines. It ensures seamless task integration within a project, allowing for better collaboration and workflow management. All created tasks are easily accessible on the project dashboard for quick updates and tracking.
– Step 1: Locate & Select the Add task section on the page’s sidebar under the subsection task under Section Settings.
– Step 2: To add a task to a particular project fill in these details:
- Enter Task Name
- Enter Task Description
- Select Task Linking Type if applicable ( A Task can have various categories that can determine its hierarchy & how they associate with other tasks )
– Step 2: Further select the particular details:
- Select Project
- Assign Task Category
- Select Assignee
- Assign Reporter
- Assign Priority
- Select Goal Head if applicable
- Assign Start date
- Assign Due date
- Assign Estimated time
– Step 3: Once all details are finalized, the Employee can click on save to add a task to the particular project. Multiple tasks can added to the project. All Created Tasks can be viewed in the View Task Page. Also, all the deleted tasks can be viewed in the Trash Bin Page.
All The created tasks will be visible on its projects dashboard, All the project members according to their assigned roles can interact & customize the tasks.

Reports
The Reports section provides valuable insights into project progress through detailed analytics and visual representations. Employees can generate reports like RACI Reports for role clarity and Gantt Charts for timeline tracking. With filtering and export options, this section helps in monitoring performance, improving decision-making, and ensuring efficient project execution.
RACI Reports
– Step 1: Locate & Select the RACI section on the page’s sidebar under the section Reports
– Step 2: Select the Particular project for the RACI report that is needed.
GANTT Chart Reports
– Step 1: Locate & Select the Gantt Chart section on the page’s sidebar under the subsection task under Section Settings.
– Step 2: Select the Particular project for the Gantt report that is needed.
Project Dashboard
The Project Dashboard section offers a centralized view of all project activities, tasks, and progress metrics. It allows employees to interact with tasks, move them across statuses, apply filters, and make bulk edits for efficient management. With built-in analytics, visual task tracking, and export options, the dashboard ensures a streamlined and organized project workflow.
– Step 1: Locate & Select the My Project section In the Task Management module.
– Step 2: Select the Particular project you need to access.
Dashboard Interactions:-
Task Movements: All the created tasks will be visible on their respective statuses and can be moved around according to their applicable transitions.
Create Task: A shortcut to task creation is given on the dashboard as well.
Filter Options: Filter options such as filtering by date, assignee, etc and give to enhance findability.
Bulk Edit: A bulk edit option is available as well to make changes to multiple tasks.
Analytics: Multiple Analytics are displayed on the dashboard such as progress, Task states, and statuses. An export options is also available to generate a concise task report in a excel form.
The Task Management – Employee User Guide serves as a comprehensive resource to help employees navigate and utilize the platform effectively. From managing projects and tasks to defining workflows, roles, and reports, this guide ensures seamless collaboration and productivity. By leveraging the platform’s features, employees can stay organized, track progress, and contribute to efficient project execution with clarity and ease.

Last modified: February 14, 2025