This user guide serves as a comprehensive resource for navigating the HRMS HR Role dashboard, providing step-by-step instructions and essential information for effective employee management. Whether you are managing attendance, leaves, or employee details, this guide will help streamline your tasks and enhance your experience within the system.The ‘Dashboard’ section provides a centralized hub for accessing key metrics and quick links essential for effective employee management. Upon logging in, users will find an intuitive interface designed to streamline navigation and enhance productivity across various HR functions.
Accessing the Dashboard
1. Open your web browser and navigate to the {provided link}
2. Log in to the dashboard using your assigned credentials.
Dashboard Home
1. Upon logging in, you will be directed to the Dashboard Home page.
2. The Dashboard Home page displays an overview of key metrics and quick links to other sections of the dashboard.
3. Review the metrics and click on any quick links to access specific functionalities.
Employee Management
1. To search for employees, click on the “Search Employees” link in the sidebar or quick links.
2. On the Search Employees page, you can search for employees by their code or name.
a. Enter the employee code or name in the search bar.
b. Click the “Search” button or press Enter.
3. The search results will display the matching employee records.
4. To view an employee’s profile, click on their name or the “View” button.
5. On the Employee Profile page, you can see detailed information about the employee.
Notifications
1. To view notifications, click on the “Notifications” link in the sidebar or quick links.
2. The Notifications page will display a list of notifications related to employee actions or system alerts.
3. To customize your notification preferences, click on the “Notification Settings” link in the sidebar or quick links.
4. Adjust your notification settings as desired and save the changes.
Role Management
1. To assign roles or manage permissions, click on the “Role Management” link in the sidebar or quick links.
2. On the Role Management page, you can select roles & manage the permissions associated with each role.
Reports and Analytics
1. To access reports and analytics, click on the “Reports/Analytics” link in the sidebar or quick links.
2. The Reports/Analytics page will provide options for various types of reports, such as performance reports, attendance reports, and custom reports.
3. Select the desired report type and configure the necessary parameters.
4. Click “Export” to generate the reports and export.
Settings
1. To access settings, click on the “Settings” link in the sidebar or quick links.
2. The Settings page will allow you to adjust user preferences and system configuration settings.
3. Modify the settings as needed and save the changes.
Remember to log out of the dashboard when you’re done to ensure the security of your account.
If you encounter any issues or have additional questions, please refer to the dashboard’s help documentation or contact the support team for assistance.

HR Role Employee Page Guide
The HR Role Employee Page offers a detailed overview of individual employee information, facilitating efficient management of personal and employment records. Users can easily navigate through sections such as personal details, employment history, and performance records, ensuring comprehensive access to essential employee data.
User Guide for Employee Details Page
1. Accessing the Employee Details Page
1. Open the Dashboard: Log in to your HR Role dashboard
2. Navigate to Employee List: Click on the “Employee” section from the sidebar or quick links.
3. Select an Employee: From the employee list, click on the name or employee code of the desired employee to access their details.
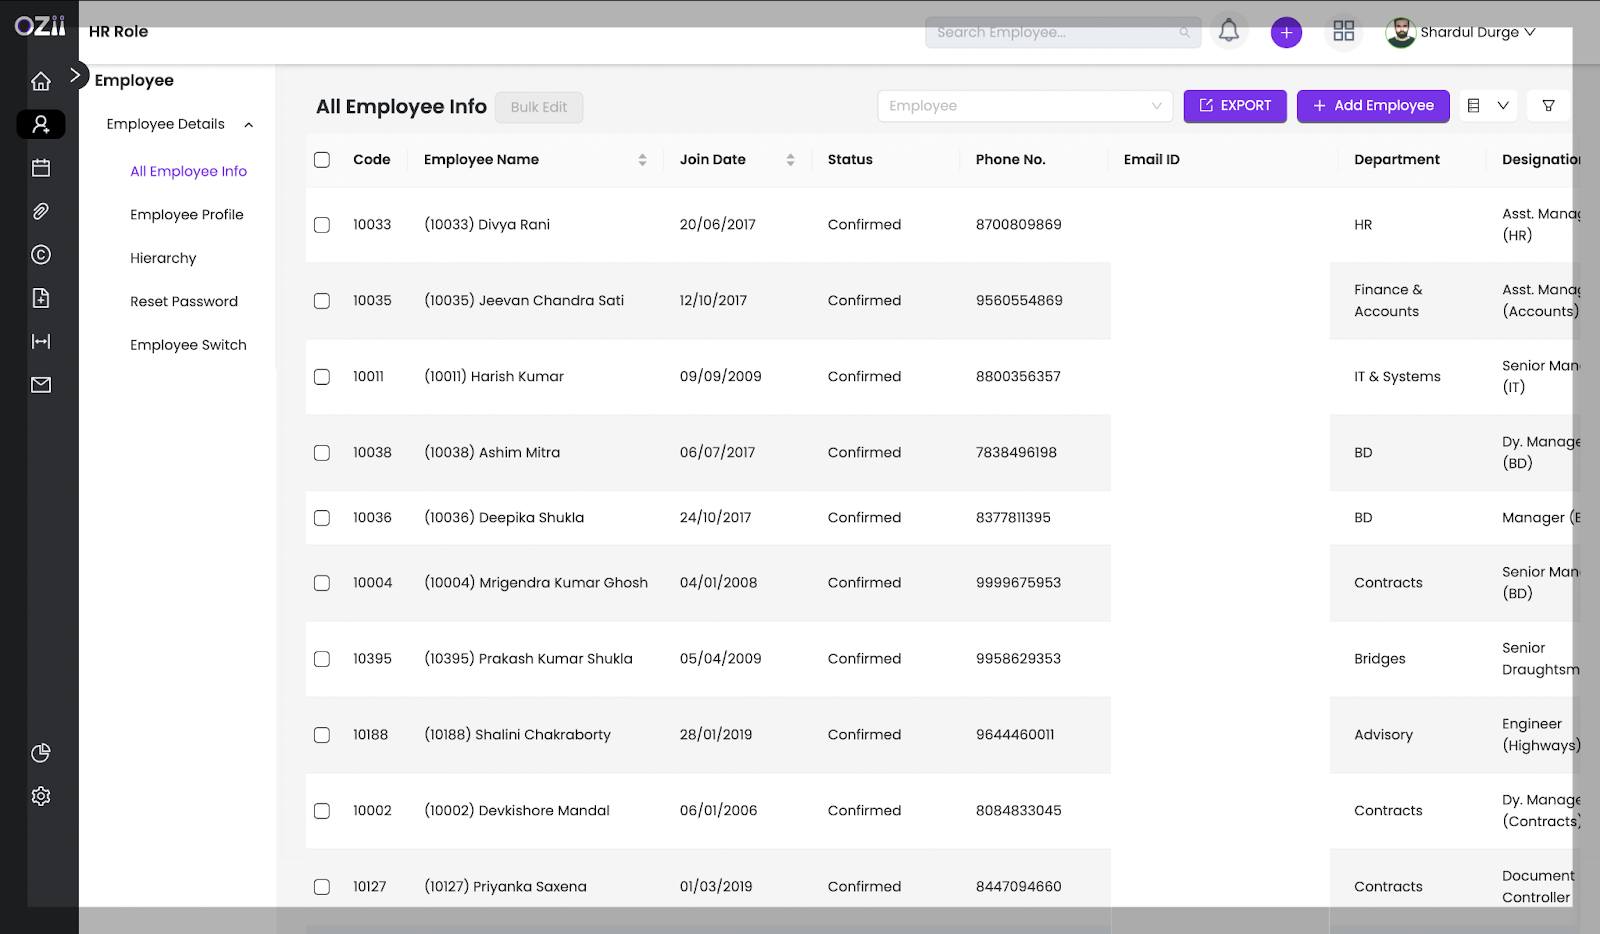
Overview of the Employee Details Page
The Employee Details page provides a comprehensive view of an employee’s information, including personal details, employment history, salary information, and performance records.
Sections of the Employee Details Page
1. Employee Information
– This section contains vital information about the employee.
Personal Information
– Name: Displays the full name of the employee.
– Employee Code: Unique identifier for the employee.
– Date of Birth: The employee’s birth date.
– Contact Information: Includes phone numbers and email addresses.
– Address: The residential address of the employee.
Employment Details
– Job Title: The current position held by the employee.
– Department: The department in which the employee works.
– Hire Date: The date when the employee joined the organization.
– Employment Status: Indicates whether the employee is active, on leave, or terminated.
Salary Information
– Current Salary: Displays the employee’s current salary.
– Salary History: A record of previous salaries and changes over time.
Performance Records
– Performance Reviews: Summaries of past performance evaluations.
– Goals and Objectives: Lists goals set for the employee and their progress.
2. Actions
– This section provides options for managing employee records.
Edit Employee Information
– Click on this option to modify any details about the employee. You will be directed to an edit form where you can make changes to personal or employment information.
1. Make necessary changes in the provided fields.
2. Click “Save” to update the information.
Delete Employee Record
– If you need to remove an employee record, click on this option.
1. Confirm your decision when prompted, as this action is irreversible.
Here’s a user guide for navigating the Employee Profile subsection within the Employee Details page:
2. Accessing the Employee Profile
1. Open the Dashboard: Log in to your HR Role dashboard.
2. Navigate to Employee List: Click on the “Employee Management” section from the sidebar or quick links.
3. Select an Employee: From the employee list, click on the name or employee code of the desired employee to access their details.
4. Go to Employee Profile: Once on the Employee Details page, locate the “Employee Profile” subsection.
Overview of the Employee Profile
The Employee Profile subsection provides a comprehensive view of an employee’s personal and contact information.
Sections of the Employee Profile
1. Personal Information
– This section contains vital personal details about the employee.
– Name: Displays the full name of the employee.
– Employee Code: Unique identifier for the employee.
– Date of Birth: The employee’s birth date.
– Gender: The gender of the employee.
– Marital Status: Indicates whether the employee is single, married, or divorced.
– Nationality: The nationality of the employee.
2. Contact Information
– This section displays the employee’s contact details.
– Phone Number: The primary phone number of the employee.
– Email Address: The official email address of the employee.
– Emergency Contact: Name and phone number of the person to be contacted in case of an emergency.
3. Address
– This section shows the employee’s residential address.
– Address Line 1: The first line of the address.
– Address Line 2: The second line of the address.
– City: The city where the employee resides.
– State: The state or province of the employee’s residence.
– Country: The country where the employee lives.
– Postal Code: The zip or postal code of the employee’s address.
Editing the Employee Profile
1. Click on the “Edit” button: Located at the top right corner of the Employee Profile section.
2. Make necessary changes: Update any of the personal, contact, or address information as required.
3. Click “Save”: After making the changes, click the “Save” button to update the employee’s profile.
Viewing Employee Documents
1. Scroll down to the “Documents” section: This section displays any documents associated with the employee’s profile.
2. Click on the document name: To view or download the file.
Here’s a comprehensive user guide for the Employee Password Reset subsection within your HR dashboard:
3. User Guide for Employee Password Reset Subsection
1. Open the Dashboard: Log in to your HR Role dashboard
2. Navigate to Employee Management: Click on the “Employee Management” section from the sidebar or quick links.
3. Go to Password Reset: On the Employee Details page, locate and click on the “Reset Password” option.
Overview of the Employee Password Reset Section
The Employee Password Reset section allows administrators to reset an employee’s password, ensuring they can regain access to their account if they forget their password or if a security issue arises.
Required Information
To successfully reset an employee’s password, you will typically need to provide the following information:
– New Password: The new password you wish to set for the employee.
– Confirm New Password: Re-enter the new password to confirm it matches.
Steps to Reset an Employee’s Password
1. Select an Employee: From the employee list, click on the name or employee code of the employee whose password you need to reset.
2. Enter New Password:
– In the designated field, type the desired new password for the employee.
– Ensure that the new password meets any specified criteria (e.g., minimum length, inclusion of special characters).
3. Confirm New Password:
– Re-enter the new password in the confirmation field to ensure it matches what you entered previously.
4. Click “Reset Password” or “Save”:
– After filling in all required fields, click the “Reset Password” or “Save” button to submit your changes.
5. Confirmation Message:
– Upon successful reset, you should see a confirmation message indicating that the employee’s password has been updated.
Tips for Creating a Strong Password
– Use a combination of uppercase and lowercase letters, numbers, and special characters.
– Avoid using easily guessable information such as birthdays or common words.
– Aim for a password that is at least 8-12 characters long.
– Consider using a passphrase for added security.
HR Role Attendance & Leaves Page Guide
The Attendance and Leave Section provides essential tools for managing employee attendance and leave requests efficiently. Users can apply for various types of leave, edit attendance records, and manage leave balances, all through a streamlined interface designed to enhance HR operations.
Leaves
1. Leaves :- Applying leave ( Manually )
– Step 1: Locate & Select the Apply Leave Application Form section on the sidebar of the page under Subsection leave.
– Step 2: Select the type of leave you wish to apply for from a dropdown menu (e.g., Casual Leave, Sick Leave).
– Step 3: Enter the following details:
– Start Date: Click on the calendar icon to select the date when your leave will begin along with the respective day durations (First half, Second Half or Full Day).
– End Date: Similarly, select the date when your leave will end along with the respective day durations (First half, Second Half or Full Day).
– Total Days: This auto-calculates based on your selected dates.
– Reason for Leave: Provide a brief explanation for your leave request (e.g., personal reasons, medical issues).
– Skip rules: This check box can be selected in case if any leaves specific rules and policies are to be ignored in any particular case.
– Step 4: Once all details are finalized, HR can click on save to register that particular leave.
2. Applying Comp off ( Manually )
– Step 1: Locate & Select the Comp Off Application Form section on the sidebar of the page under Subsection leave.
– Step 2: Select the employee of whom you wish to apply for from a dropdown menu.
– Step 3: Enter the following details:
- Select the extra days that that particular employee has fulfilled and is eligible for. The selected days will automatically be reflected on the form.
- Start Date: Click on the calendar icon to select the date when your comp off will begin along with the respective day durations (First half, Second Half or Full Day).
- End Date: Similarly, select the date when your comp off will end along with the respective day durations (First half, Second Half or Full Day).
- Reason for Comp Off: Provide a brief explanation for your request (e.g., extra hours worked, special circumstances).
– Step 4: Once all details are finalized, HR can click on save to register that particular leave.
3. Canceling leaves
– Step 1: Locate & Select the Cancel Leave section on the sidebar of the page under Subsection leave.
– Step 2: Once on the page, scroll through the list to view all leaves that have been applied and approved.
- Step 2 Each entry will typically include:
- Employee Name: The name of the employee who applied for leave.
- Leave Remarks: The remarks for the leave applied for.
- Start Date: The date when the leave begins.
- End Date: The date when the leave ends.
- Status: Current status of the application (e.g., Approved, Pending, Rejected).
– Step 3: Locate the Cancel action Button on the far right of every listed respective leave.
– Step 4: Confirmation Pop Up will appear for the affirmation of the leave cancellation. Once Confirmed the leave will be successfully canceled.
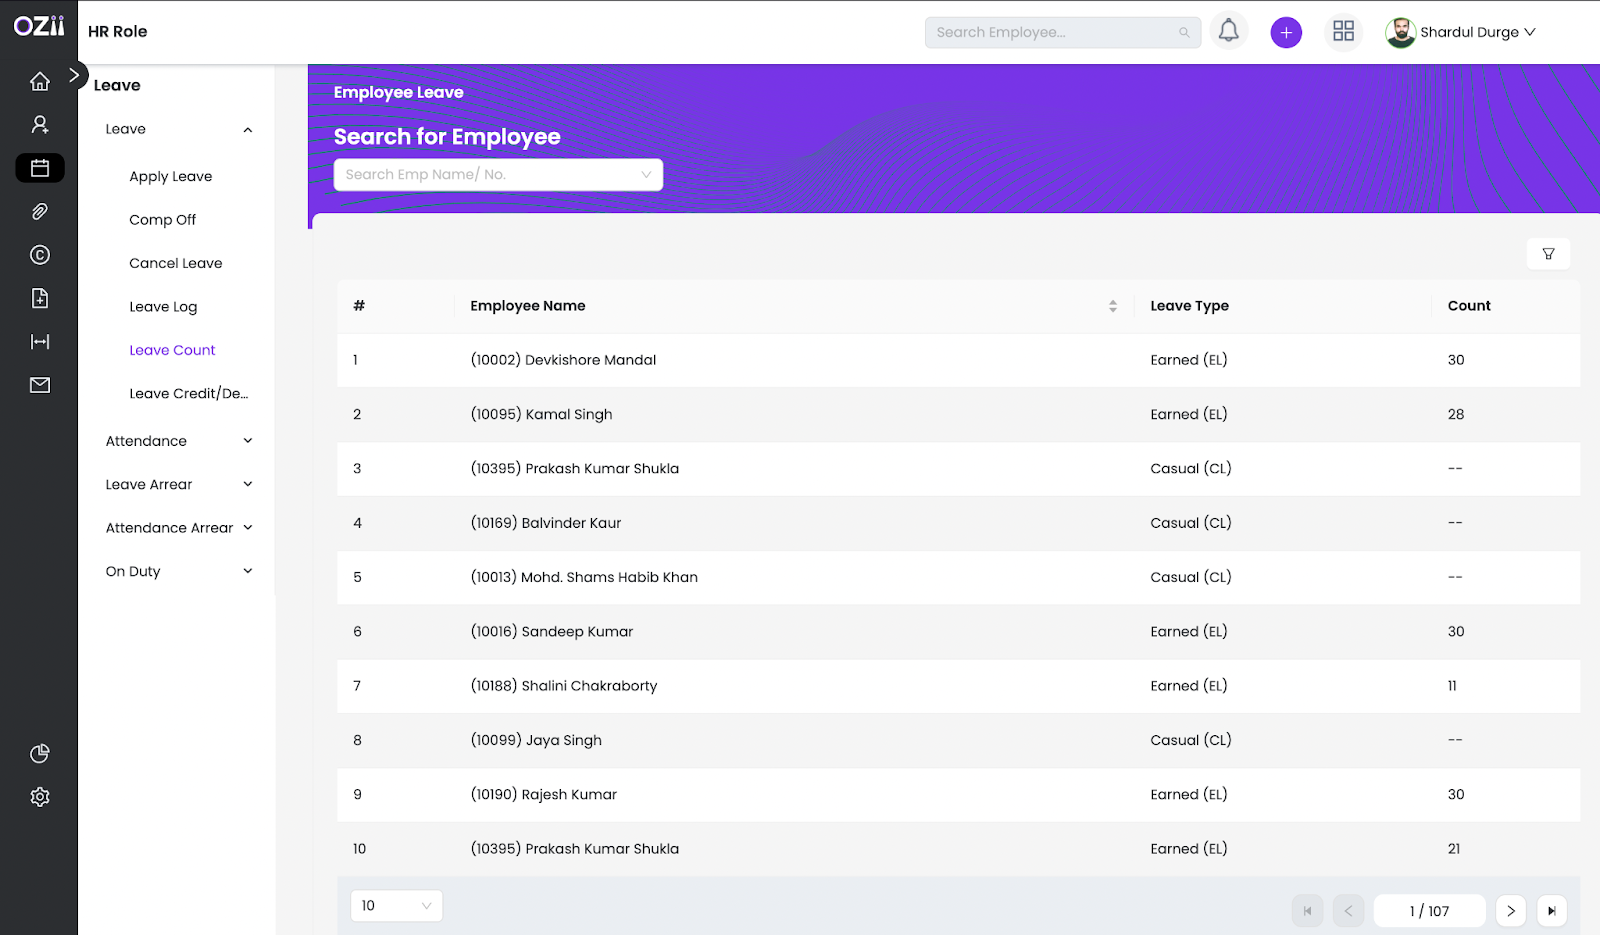
4. Leave credit/Debit
– Step 1: Locate & Select the Leave Credit/Debit section on the sidebar of the page under Subsection leave.
– Step 2: Select the employee of whom you wish to apply for from a dropdown menu.
– Step 3: Scroll down to find the Credit/Debit Form section.
– Step 4 : Select Weather to Credit or Debit the leaves for the selected employee.
– Step 4: Enter the following details:
- Leave Type: Choose from available options (e.g., Casual Leave, Sick Leave).
- Number of Days: Specify how many days you wish to credit.
– Step 5: Once all details are finalized, HR can click on save to Credit/Debit that particular leave.
Attendance
The Attendance Section allows HR personnel to efficiently manage and edit employee attendance records, ensuring accurate tracking of work hours and attendance status. Users can update attendance details, refresh records, and lock attendance periods to maintain data integrity.
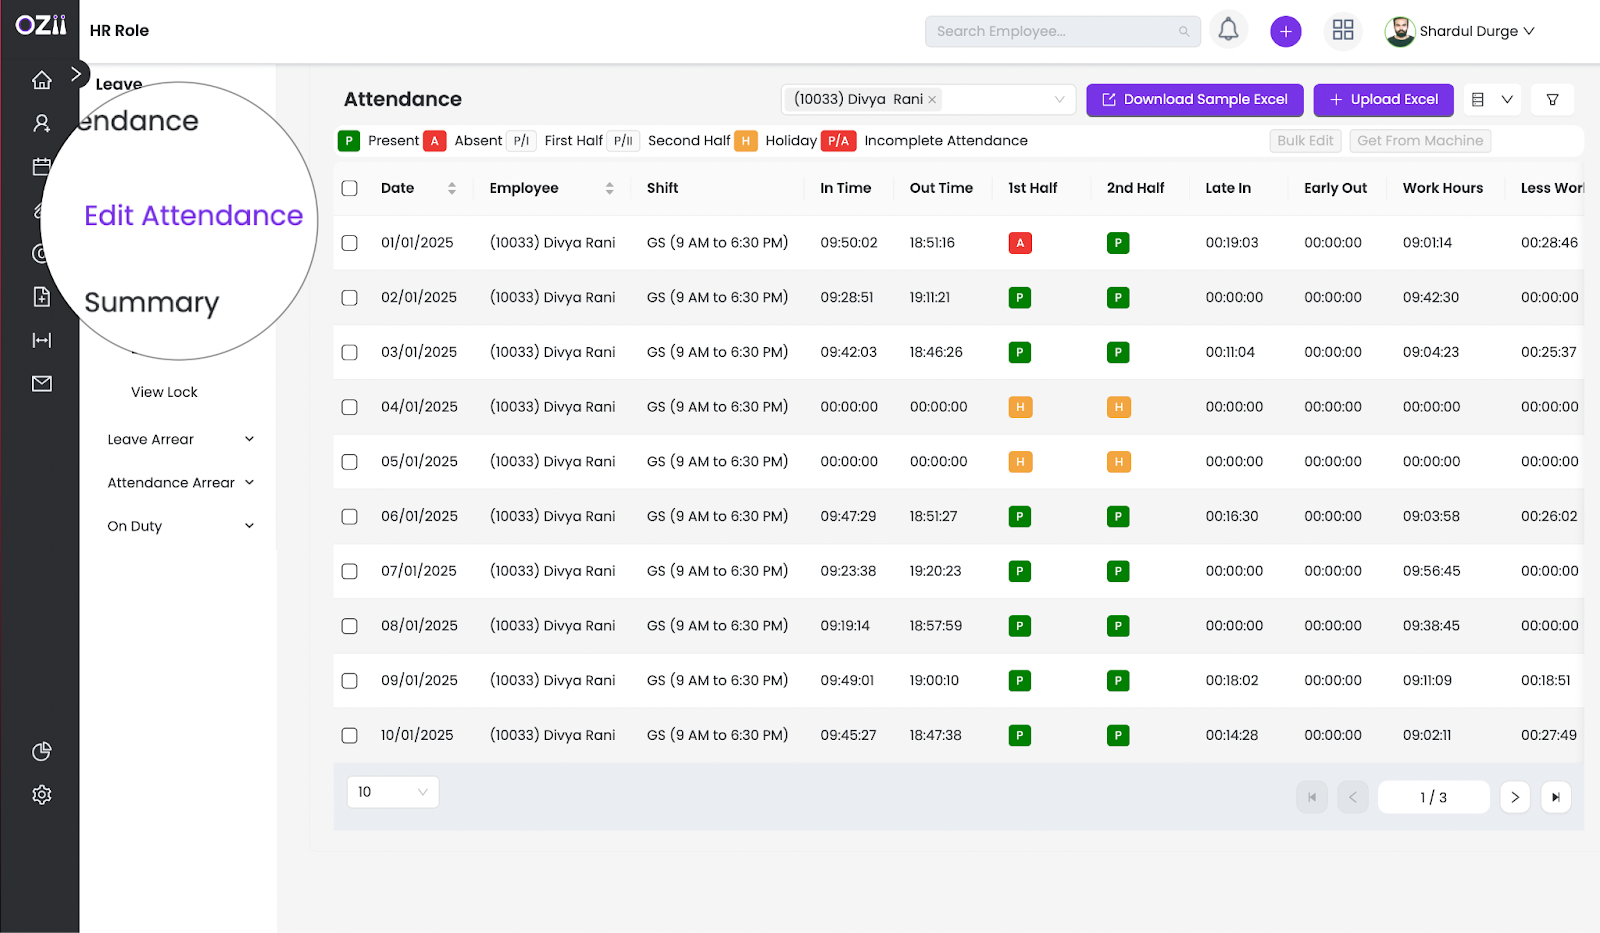
1. Edit Attendance
– Step 1: Locate & Select the Edit Attendance section on the sidebar of the page under Subsection Attendance.
-Step 2: Employee Selection: A dropdown or search function to select the employee whose attendance you want to edit. A table displaying the attendance records for the selected employee will be viewed
-Step 4: Scroll to the far right where you will find the Edit Action button, where an attendance editing form will appear.
– Step 5: Edit & Enter the following details:
- Attendance status
- In time, Out time, working Hours, Late in time, Early exit time, Extra hours
- Check box for Comp off is also available
- Remarks for the Attendance editing is mandatory for proceeding further.
– Step 6: Once all details are finalized, HR can click on save and edit the particular attendance..
2. Refresh Attendance
( Refresh attendance is particularly used in some scenarios and case where the data is not being reflected in the ERP correctly even when attendance matrix have been recorded )
– Step 1: Locate & Select the Refresh Attendance section on the sidebar of the page under Subsection Attendance.
– Step 2: Select Particular fields under refresh attendance form
- There is an option choice of selecting particular department
- Similarly any employee can be selected (Department specific as well ) Or option of all employees is also available
- Select the particular location of the workspace
- And finally select the date range of the attendance to be refreshed.
-Step 3: Once all details are finalized, HR can click Machine refresh/Manual Refresh to successfully refresh attendance status.
3. Lock Attendance
( Lock attendance is usually used when an attendance of a particular is to be locked cannot be edited in any case furthermore )
– Step 1: Locate & Select the Lock Attendance section on the sidebar of the page under Subsection Attendance.
– Step 2: Select Particular fields under Lock attendance form
- Select the year of the month to be selected
- Select the month of the attendance to be locked.
-Step 3: Once all details are finalized, HR can click Save to successfully Lock the selected month’s attendance.
Leave Arrears
The Arrear Section enables HR personnel to efficiently manage and record leave arrears for employees, ensuring accurate tracking of outstanding leave balances. Users can add, edit, or review leave arrears, streamlining the process of maintaining employee leave records.
1. Add Arrears ( Leaves )
– Step 1: Locate & Select the Add leave arrear section on the sidebar of the page under subsection Leave Arrear.
-Step 2: Employee Selection: A dropdown or search function to select the employee whom you want to add leave arrears
-Step3 : Select the leave type to be added.
– Step 4 (A): Select Particular if selected Normal Leave
- Leave Type: Choose from available options (e.g., Casual Leave, Sick Leave).
- Select Start Date: Click on the calendar icon to select the date when your comp off will begin along with the respective day durations (First half, Second Half or Full Day).
- Select End Date: Similarly, select the date when your comp off will end along with the respective day durations (First half, Second Half or Full Day).
- Specify reason in remarks.
– Step 4 (B): Select Particular if selected Compensatory off (Comp Off)
- Select extra days that that particular employee has fulfilled and is eligible for. The selected days will automatically will be reflected on the form.
- Select Start Date: Click on the calendar icon to select the date when your comp off will begin along with the respective day durations (First half, Second Half or Full Day).
- Select End Date: Similarly, select the date when your comp off will end along with the respective day durations (First half, Second Half or Full Day).
- Reason in remarks for Comp Off: Provide a brief explanation for your request (e.g., extra hours worked, special circumstances).
-Step 5: Once all details are finalized, HR can click Save to successfully add arrear (leave).
Attendance Arrears
The Attendance Arrear Section allows HR personnel to efficiently manage and record attendance arrears for employees, ensuring accurate tracking of outstanding attendance discrepancies. Users can add, edit, or review attendance arrears, streamlining the process of maintaining precise employee attendance records.
1. Add arrear ( Attendance )
– Step 1: Locate & Select the Add Arrear section on the sidebar of the page under subsection Attendance Arrear.
– Step 2: Select Particular fields under add arrear form
- Select the Employee
- Select the date
- Select the attendance status
-Step 3: Once all details are finalized, HR can click Save to successfully add arrear (attendance).
On Duty
The On Duty Section allows HR personnel to efficiently manage and record employee on-duty assignments, ensuring accurate tracking of work-related activities outside regular hours. Users can add, edit, or review on-duty records, streamlining the process of maintaining comprehensive attendance data.
1. Add on duty
– Step 1: Locate & Select the Add On Duty section on the sidebar of the page under subsection On duty.
– Step 2: Select Particular fields under add arrear form
- Select the Employee
- Select the Category & Subcategory
- Select Start Date: Click on the calendar icon to select the date when your comp off will begin along with the respective day durations (First half, Second Half or Full Day).
- Select End Date: Similarly, select the date when your comp off will end along with the respective day durations (First half, Second Half or Full Day).
- Reason in remarks for On Duty: Provide a brief explanation for your action.
-Step 3: Once all details are finalized, HR can click Save to successfully add On Duty.
HR Role Grievance Page Guide
The Grievance Page provides a structured platform for employees to formally submit and track their grievances, ensuring their concerns are addressed promptly. Users can easily navigate through the submission process, monitor the status of their complaints, and receive updates on resolutions.
All Grievance
– Step 1: Locate & Select the All Grievance section on the sidebar
– Step 2 : Select View to see Grievance details ( Remarks ). Reporter remarks can also be viewed from an option on the far right.
– Step 2 : Select View Details to see details ( Dates )
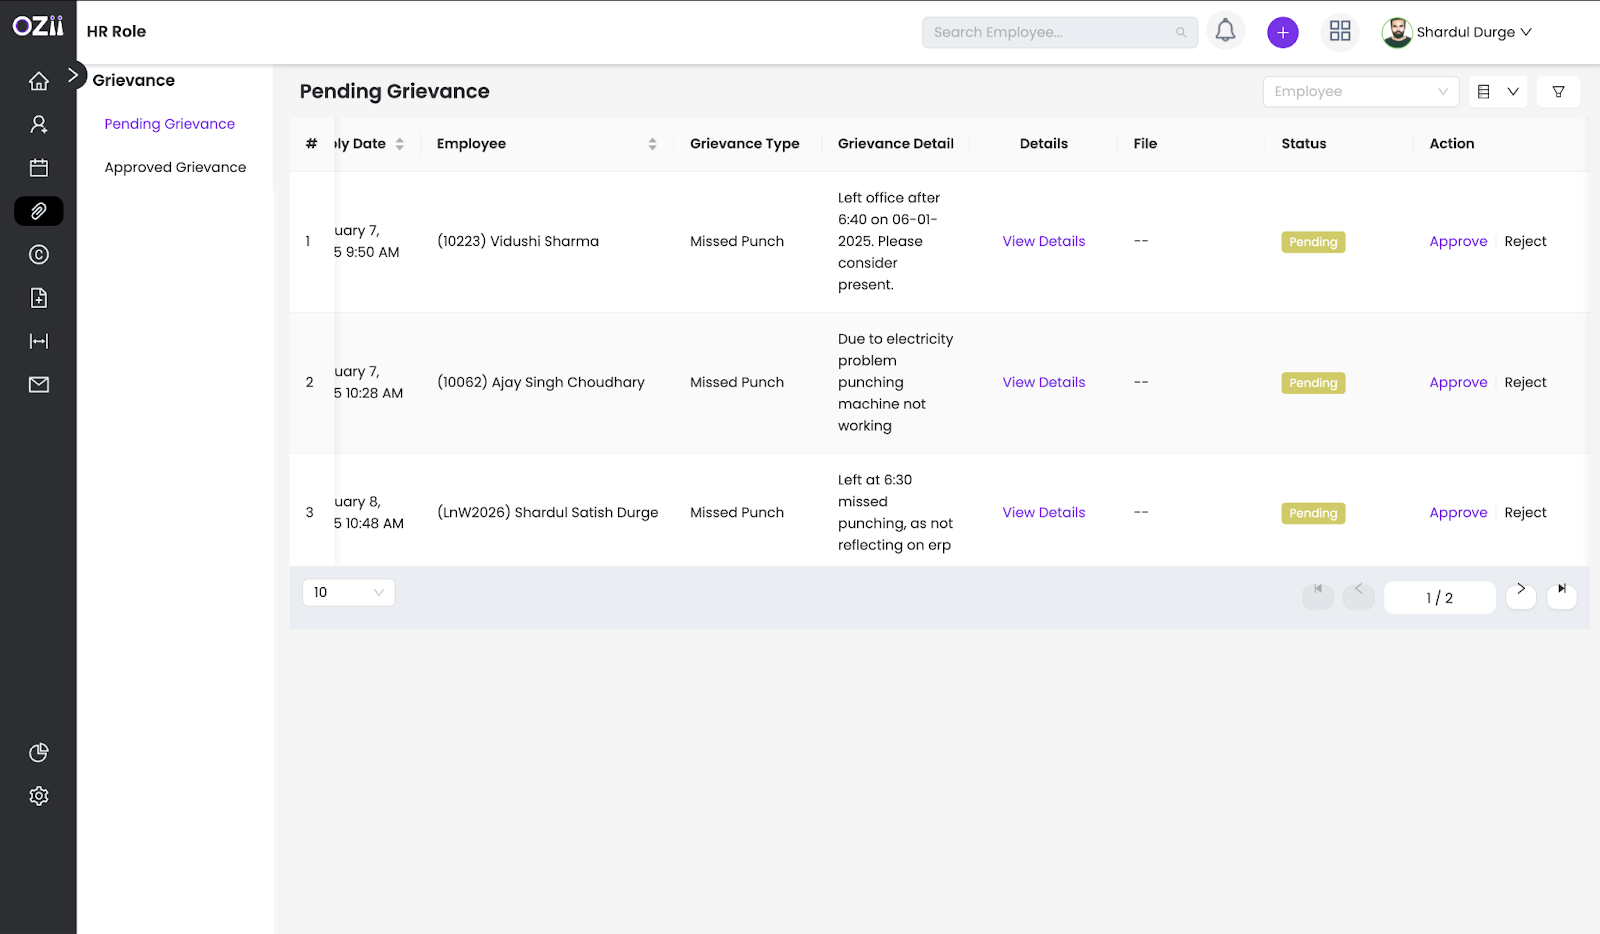
Pending Grievance
– Step 1: Locate & Select the Pending Grievance section on the sidebar
– Step 2 : Select View Details to see details ( Dates )
– Step 3 : Select Take Action to Approve or reject the grievance request.
– Step 4 : Pop up form will appear, Select Particular fields on the form
- Write Remarks for the the action
-Step 3: Once all details are finalized, HR can click Accept or Reject to successfully execute the Grievance action.
HR Role Circulars/Policy Page Guide
The HR Circulars/Policy Page serves as a centralized repository for all organizational policies and circulars, ensuring that employees have easy access to important guidelines and updates. Users can navigate through the various documents, staying informed about the latest HR policies and procedures that govern workplace conduct and benefits.
Circulars
1. New Circular
– Step 1: Locate & Select the New Circular section on the sidebar of the page under subsection Circulars.
– Step 2: Select Particular fields under New circular form.
- Select the Circular type
- Select the Title of the Circular
- Select the location and department of the workplace the circular to be displayed
- Upload the File
-Step 3: Once all details are finalized, HR can click Save to successfully Publish the circular.
2. View Circular
– Step 1: Locate & Select the View Circular section on the sidebar of the page under subsection Circulars.
– Step 2 : Select File to see the uploaded document
– Step 3 (A) : Select Edit to make changes to the existing circular.
– Step 3 (B) : Select Delete to remove (delete) the existing circular.
3. View Circular Type (Add New Circular Type)
– Step 1: Locate & Select the View Circular Type section on the sidebar of the page under subsection Circulars.
– Step 2 : Select Add New to add a new circular type
– Step 3 : Add Value in the field to add a new circular type.
-Step 4: Once all details are finalized, HR can click Save to successfully Publish new circular type..
HR Role Onboarding Page Guide
The Onboarding Guide Section provides a comprehensive framework for integrating new employees into the organization, ensuring a smooth transition and orientation process. Users can access essential resources, checklists, and training materials designed to facilitate effective onboarding and enhance the new hire experience.
Candidates
1. View Candidates
– Step 1: Locate & Select the View Candidate section on the sidebar of the page under subsection Candidates.
– Step 2: List of applicants will be displayed, you can select applicants via checkbox on left
– Step 3: Reject or Shortlist Applicants to further process the candidates.
Jobs
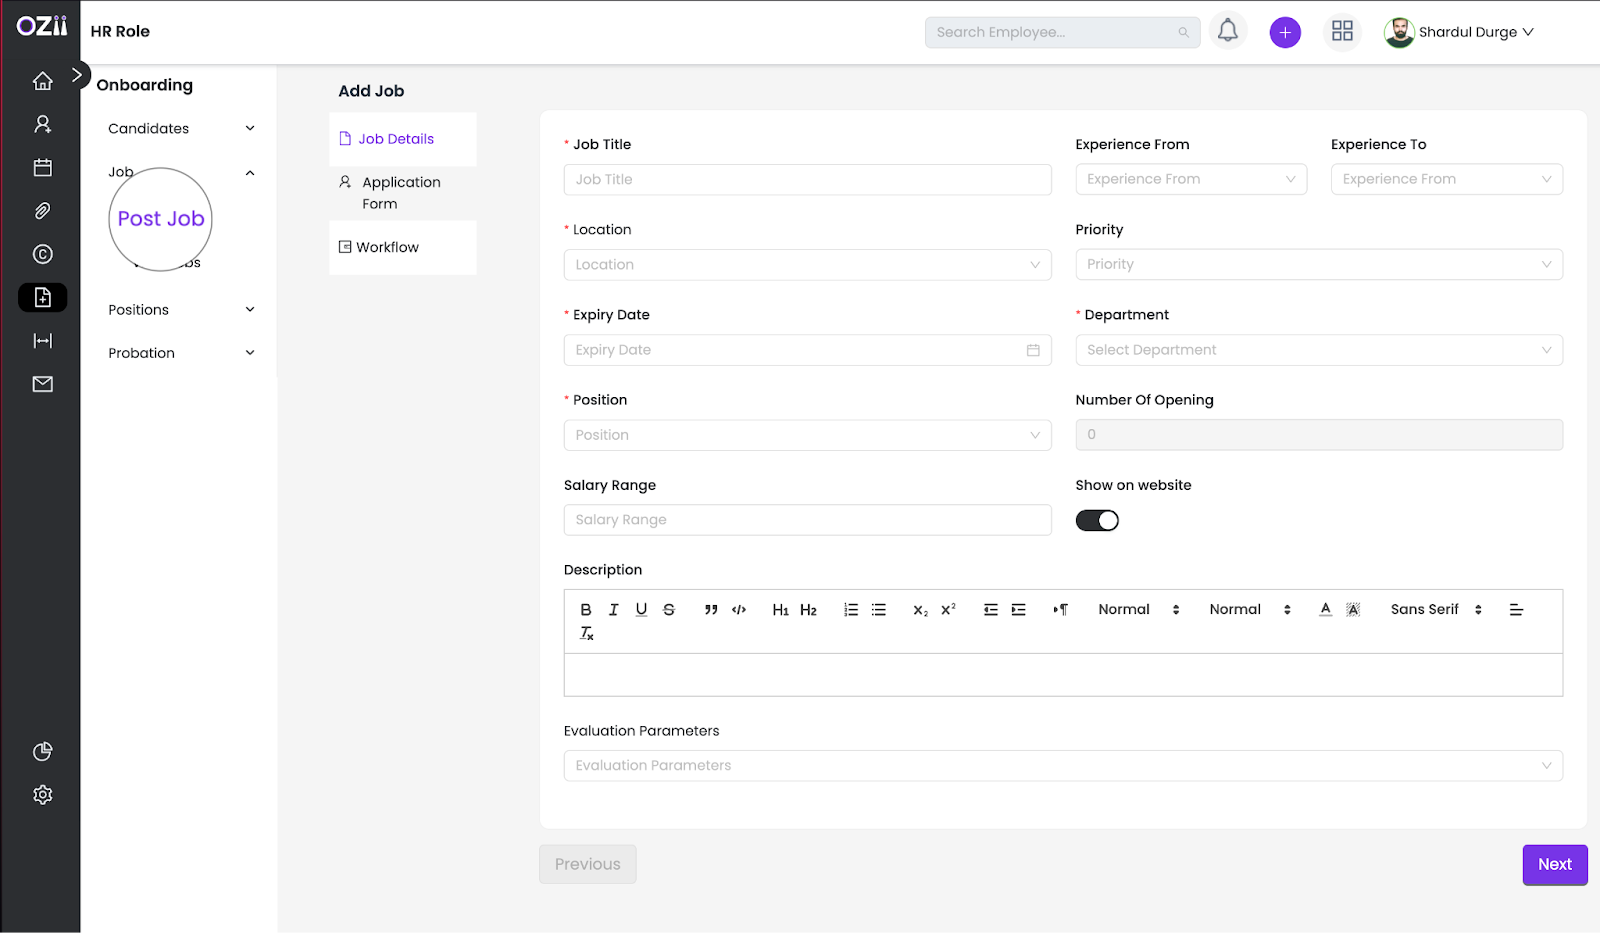
1. Post Job
– Step 1: Locate & Select the Post Job section on the sidebar of the page under subsection Jobs.
– Step 2: Fill Particular fields under Job Details form.
- Add the Job title
- Select experience from and to
- Select the location, Department & Priority for the position offered
- Add Expiry date for the position offered
- Specify Number of position offered
- Specify Salary range
- Add Job description
- Specify Evaluation parameters
-Step 4: Once all details are finalized, HR can click Next to Proceed to application form (screening form )
-Step 5 (A): Select a template for an existing screening questionnaire
-Step 5 (B): Add a template name if a new screening questionnaire being made
- Add questions By clicking on Add New consecutively.
-Step 6: Once all details are finalized, HR can click Next to Proceed to workflow form
-Step 7 (A): Select a template for an existing workflow
-Step 7 (B): Add a template name if a new workflow being made
- Specify stage name
- Select Interviewing role.
( Interview stages can be added consecutively by selecting Add New )
-Step 4: Once all details are finalized, HR can click Publish to successfully Publish a new Job which can be viewed in View jobs.
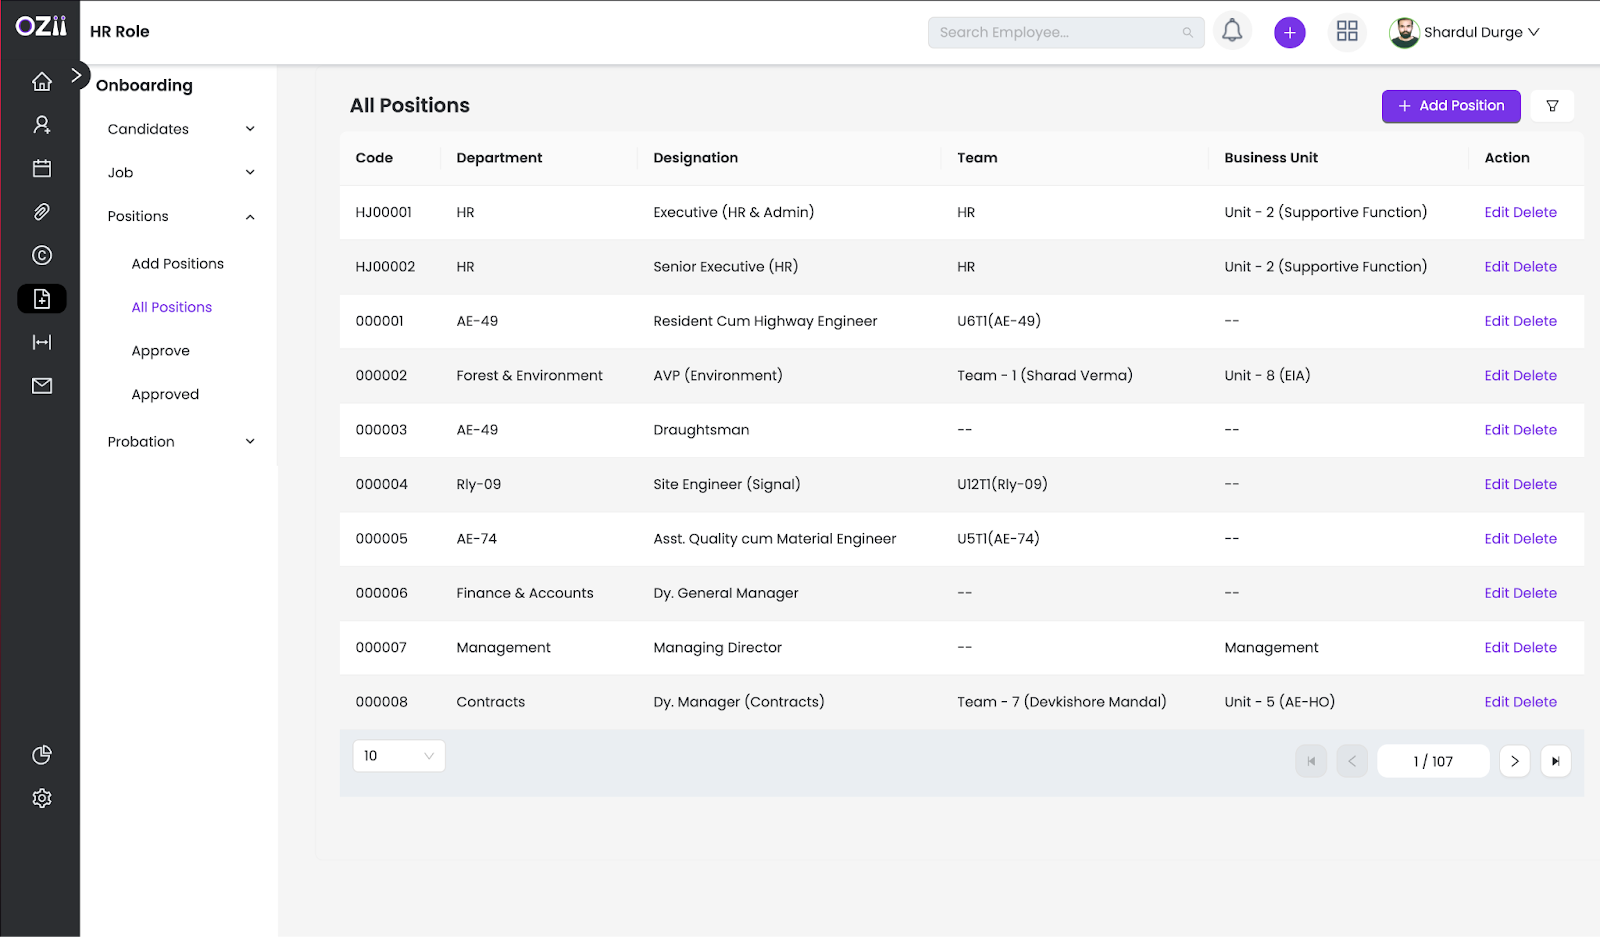
Positions
1. Add positions
– Step 1: Locate & Select the Add positions section on the sidebar of the page under subsection Positions.
– Step 2: Fill Particular fields under Add Position form.
- Select the Departments
- Select the Designation
- Select the Team
- Select the Business Unit
-Step 4: Once all details are finalized, HR can click Save to successfully Publish a new Position which can be viewed in All Positions.
HR Role Separation Page Guide
The Onboarding Guide Section provides a comprehensive framework for integrating new employees into the organization, ensuring a smooth transition and orientation process. Users can access essential resources, checklists, and training materials designed to facilitate effective onboarding and enhance the new hire experience.
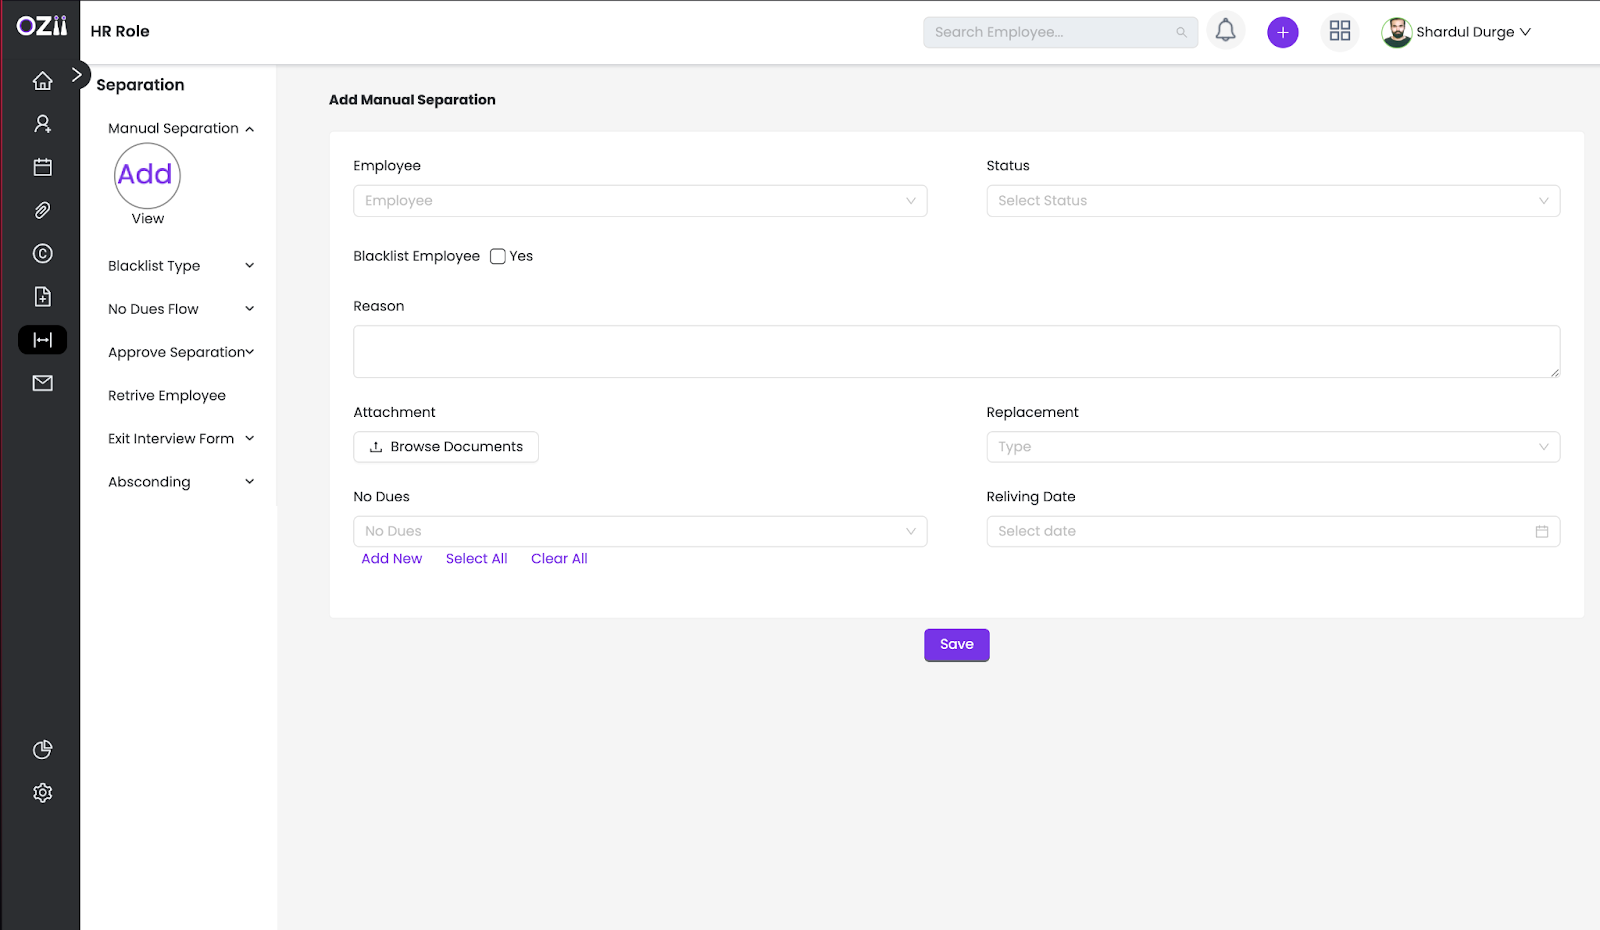
Manual Separation
1. Add (Manual Separation)
– Step 1: Locate & Select the Add section on the sidebar of the page under Manual Separation.
Particular
– Step 2: Fill fields under Add form.
- Select the employee to be separated
- Select the Status of the separation.
- Optional checkbox of blacklist is available ( Select the blacklist type in the drop down )
- Specify reason for separation
- Add attachments if any
- Select replacement need status
- Select the relieving date
-Step 3: Make a selection of departments who have declared “no Dues” for that particular employee. ( Option to add another department is also available from add new action button
-Step 4: Once all details are finalized, HR can click Save to successfully Publish the separation, which can be viewed in View ( Separation ).
Blacklist Type
1. Create Blacklist
– Step 1 : Locate & Select the Create ( Blacklist type ) section on the sidebar of the page under Blacklist type.
– Step 2 : Fill Particular fields under the Create blacklist type form.
- Specify Blacklist Type
- Specify Blacklisting period ( In Months )
- Optional Checkbox for Early rejoin is available.
-Step 3 : Once all details are finalized, HR can click Save to successfully Publish the blacklist type, which can be viewed in View ( Blacklist Type ).
No Dues Flow
1. Approve No Dues
– Step 1 : Locate & Select the Approve No Dues section on the sidebar of the page under No Dues.
– Step 2 : List of all pending approval will be visible, on The far right select the action button to Approve or reject
Incomplete
2. View Approved No Dues
– Step 1 : Locate & Select the View Approve No Dues section on the sidebar of the page under No Dues.
– Step 2 : By Clicking on the view action button, you’ll be able to approve status of all respective departments.
3. No Dues Flow
– Step 1 : Locate & Select the No Dues Flow section on the sidebar of the page under No Dues.
– Step 2 : Click on Add/Edit To create a new No Dues Flow or Edit the existing No Dues Flow.
– Step 3 : Fill Particular fields under the Create No dues flow form.
- Specify No due head 1
- Select category for the particular head ( Option to add Add new category is also available )
- Select The roles who will approve the no dues in that particular stage.
- Option to add another item is given to add the next stage of the approval flow.
-Step 4 : Once all details are finalized, HR can click Submit to successfully Publish the no dues flow, which can be viewed in the same.
Approve Separation
1. Approve Separation
– Step 1 : Locate & Select the Approve section on the sidebar of the page under Approve separation.
– Step 2 : List of all Pending separation will be visible on this page, On the far right Action button will be available to Accept & Reject.
– Step 3 (A) : Fill Particular fields under the Approve form.
- Specify Checkbox for accepting early release
- Specify Checkbox for Blacklist employees
- Specify replacement status
- Specify Remarks for the approval.
– Step 3 (B) : Fill Remarks field under the Reject form.
-Step 4 : Once all details are finalized, HR can click Approve/Reject to successfully Approve/Reject the separation.
1. View Separation
– Step 1 : Locate & Select the View section on the sidebar of the page under Approve separation.
– Step 2 : List of all Approved separation will be visible on this page, On the right Multiple Action button will be available to :-
- View Uploaded file from employees
- View Details for separation
- View the experience letter issued
- And Action buttons to Generate Seperation Report PDF, Generate mail history and Specify Separation date.
Retrieve Employee
1. Retrieve Employee
– Step 1 : Locate & Select the Retrieve employee section on the sidebar.
– Step 3 : Fill Particular fields under the form.
- Select Employee ( List of separated employee with rejoin allowed will appear in the drop down )
- Specify Rejoining date of the previous employee
-Step 4 : Once all details are finalized, HR can click Save to successfully Retrieve the employee
Exit Interview Form
1. Add Exit Interview form ( Send Exit Interview Form )
– Step 1 : Locate & Select the Add section on the sidebar of the page under Exit Interview Form.
– Step 2 : Select the employee ( List of separated employee with rejoin allowed will appear in the drop down )
-Step 3 : Once all details are finalized, HR can click Save to successfully send the exit interview form, which can also be viewed on the View ( Exit interview form ) Page.
Last modified: February 14, 2025