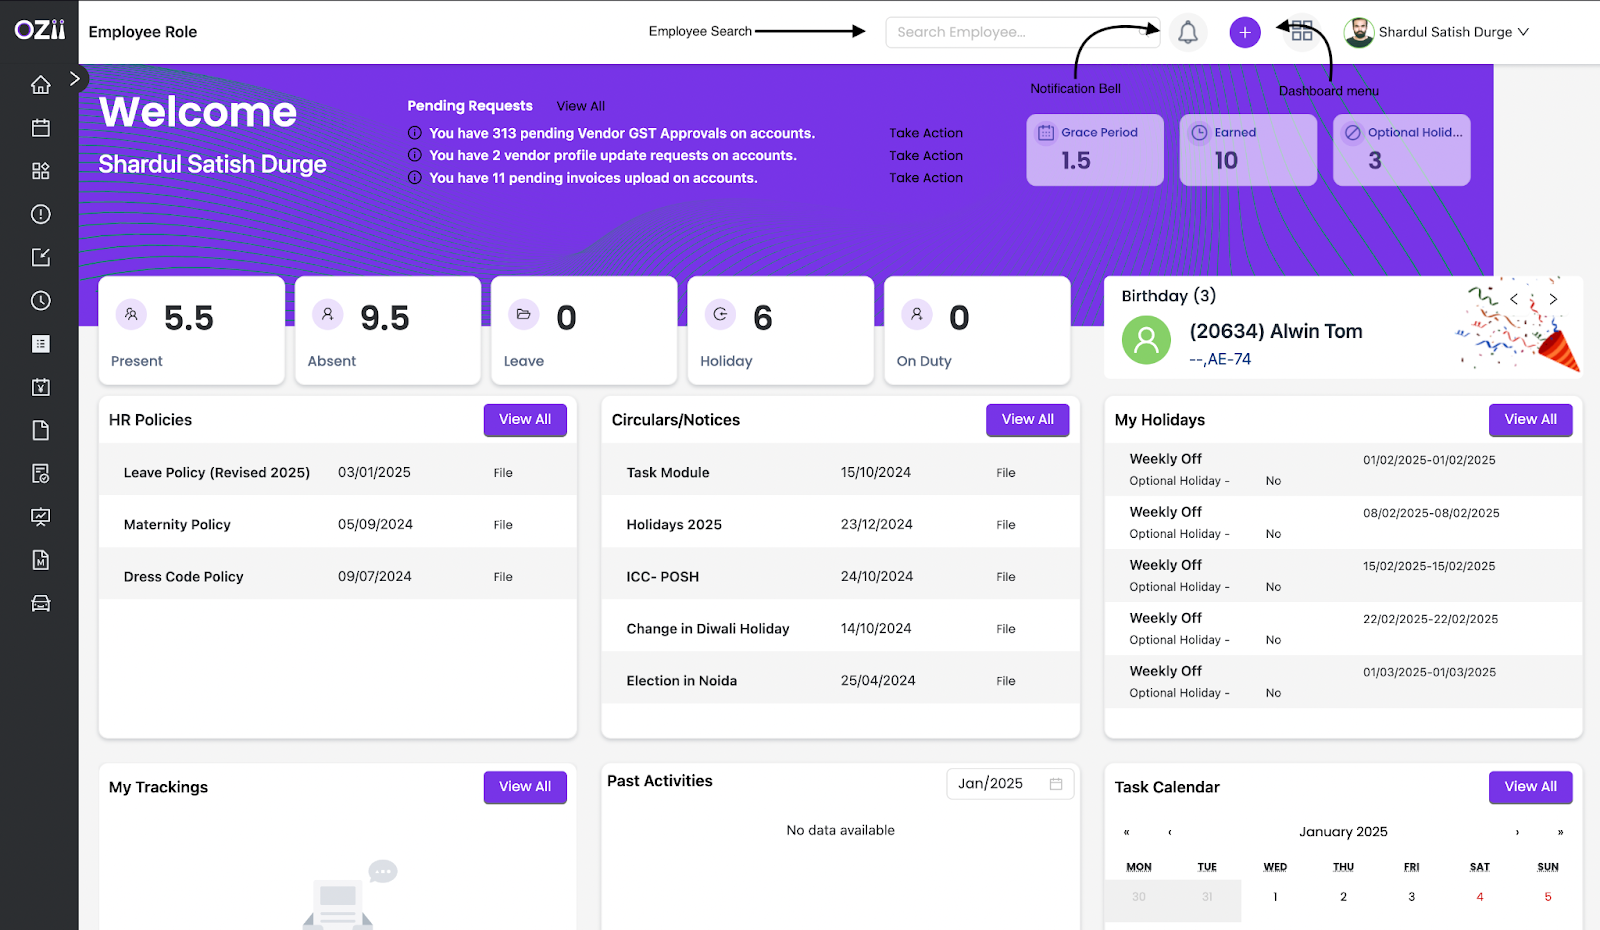
This guide provides comprehensive instructions for navigating and utilizing the HRMS Employee Role dashboard effectively. It covers essential features, including employee search, attendance management, leave applications, and grievance submissions, ensuring users can efficiently manage their HR tasks. The dashboard serves as the central hub for users, providing quick access to essential features like employee search, notifications, and role management. It allows for seamless navigation and customization, enabling users to tailor their experience according to their specific needs.
Dashboard Controls (Applicable All Roles)
Accessing the Employee Search
- Log in to your dashboard.
- Locate the search bar in the top center of the header.
Performing the Employee Search
- In the search bar, type in the employee code or name you wish to find.
- Press Enter or click the search icon.
Viewing Search Results
- The search results will appear below the search bar, displaying the employee’s information.
- Review the results to find the employee you were searching for.
Accessing the Notification Bell
1. Log in to your dashboard.
2. Locate the bell icon in the top right corner, next to the employee search bar.
Viewing Notifications
3. Click on the bell icon to open the notification dropdown.
4. The notification dropdown will appear, displaying your recent notifications.
Attending to Specific Notifications
5. Scroll through the notification dropdown to find the particular notification you want to attend to.
6. Click on the notification to be redirected to the corresponding action.
Taking Action
7. You will be redirected to the specific page or action related to the notification you selected.
8. Proceed with the necessary steps to address the notification.
Accessing Role Selection
1. Log in to your dashboard.
2. Look for the icon with four stacked squares located in the top right corner, next to the notification bell icon.
Navigating to the Roles Menu
3. Click on the icon with four stacked squares to open the roles menu.
Selecting Your Desired Role
4. Browse through the list of available roles displayed in the menu.
5. Click on the role you desire to select it.
Confirming Your Role Selection
6. After selecting your role, you may be redirected or prompted to confirm your choice.
7. Follow any additional instructions if necessary to finalize your role selection.
Accessing Dashboard Display Controls
1. Log in to your HR Role dashboard.
2. Locate the plus icon (+) on the header, near the role selection icon.
Opening the Dashboard Display Options
3. Click on the plus icon (+) to open the dropdown menu containing all dashboard display options.
Customizing Your Dashboard Display
4. In the dropdown menu, you will see a list of various dashboard elements.
5. To customize your view, select or deselect any particular dashboard elements by clicking on them.
Finalizing Your Display Settings
6. Once you have made your selections, the dashboard will automatically update to reflect your changes.
7. Review the dashboard to ensure it displays the elements you want.
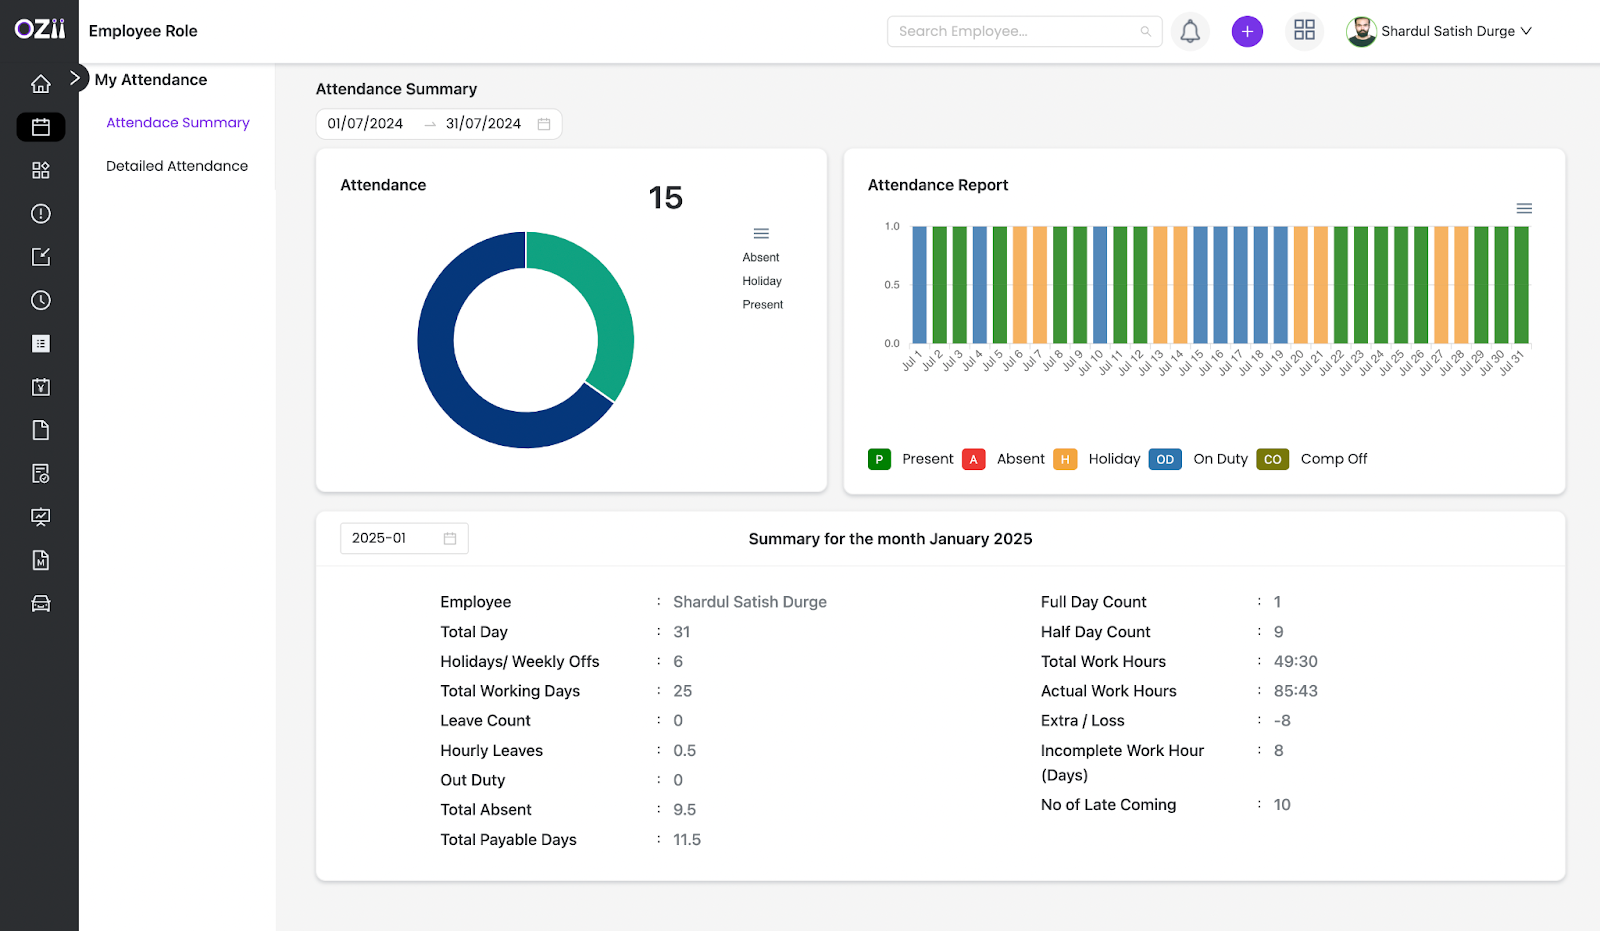
My Attendance
In the ‘My Attendance’ section, users can easily access their attendance records and summaries, providing a clear overview of their attendance patterns. This feature includes an attendance summary with visual data representations and detailed records for comprehensive tracking of attendance history.
1. Attendance Summary
– Step 1: Locate & Select the Attendance Summary section on the sidebar of the page under Subsection My Attendance.
– Step 2: You can access & view details on the attendance dashboard such as, Overall attendance pie chart, Daily attendance report and Monthly attendance summary.
2. Detailed attendance
– Step 1: Locate & Select the Detailed Attendance section on the sidebar of the page under Subsection My Attendance.
– Step 2: You can access & view details on the attendance dashboard such as, Complete detailed attendance record.
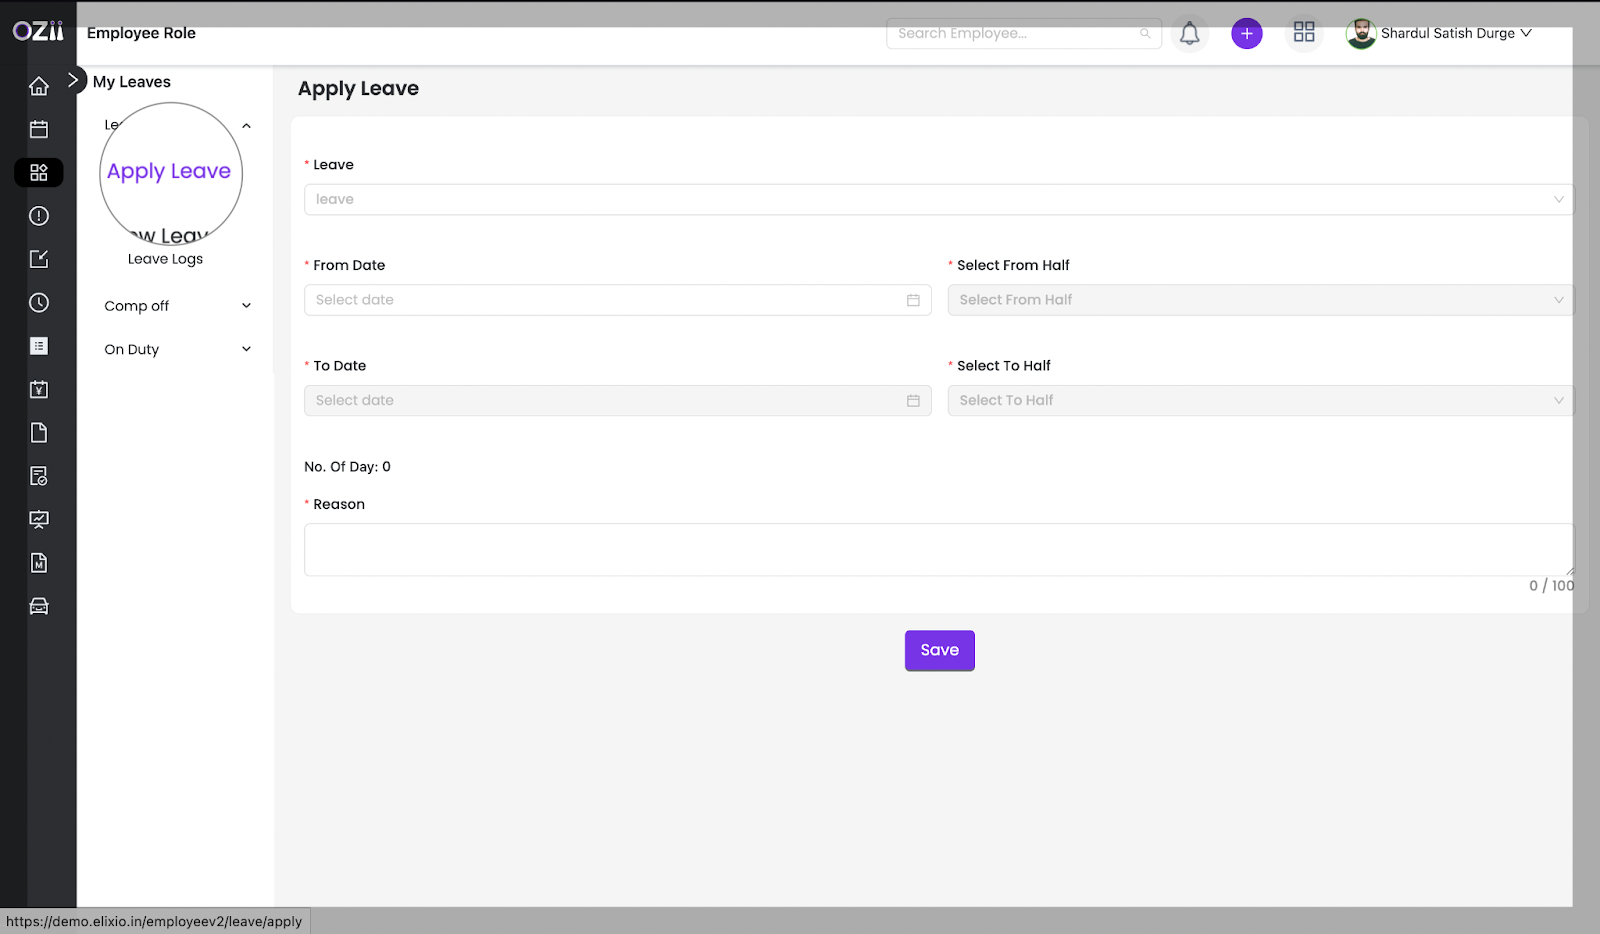
My Leaves
In the ‘My Leaves’ section, users can efficiently manage their leave requests by applying for different types of leave & tracking their leave logs. This feature streamlines the leave management process, allowing users to submit requests with specific details and monitor their leave balances effectively.
Leaves
1. Apply Leaves
– Step 1: Locate & Select the Apply Leaves section on the sidebar of the page under section Leaves under subsection My Leaves
– Step 2: Enter the following details on the leaves form:
- Specify Leave type.
- Select the leave start date ( from date ) & Specify from which half of the day.
- Select the leave end date ( to date ) & Specify till which half of the day.
- Specify the reason for the leave on remarks filed.
– Step 3: Once all details are finalized, Employee can click on save to register the particular Leave. All the applied leaves and statuses can be seen on the View leaves page.
1. Leave logs
– Step 1: Locate & Select the Leave logs section on the sidebar of the page under section Leaves under subsection My Leaves
– Step 2: You can access & view details on the leave logs dashboard such as, Credited leaves and Credit dates for the leaves.
Comp off
In the ‘Comp Off’ section, users can efficiently submit their requests for compensatory off days by detailing the extra hours worked and selecting the relevant dates. This feature simplifies the process of applying for comp off, allowing employees to provide the necessary information and track their applications seamlessly.
1. Comp off
– Step 1: Locate & Select the Comp Off Application Form section on the sidebar of the page under section comp off subsection My Leaves.
– Step 3: Enter the following details:
- Select the extra days that you have fulfilled and are eligible for. The selected days will automatically be reflected on the form.
- Start Date: Click on the calendar icon to select the date when your comp off will begin along with the respective day durations (First half, Second Half or Full Day).
- End Date: Similarly, select the date when your comp off will end along with the respective day durations (First half, Second Half or Full Day).
- Reason for Comp Off: Provide a brief explanation for your request (e.g., extra hours worked, special circumstances).
– Step 4: Once all details are finalized, the Employee can click on save to register that particular Comp off, All the applied can be viewed in the View Comp off section.
On Duty
In the ‘On Duty’ section, users can efficiently submit their on-duty requests by selecting the appropriate category and specifying the relevant dates and durations. This feature allows employees to provide necessary details for their on-duty applications, ensuring a streamlined process for tracking and managing on-duty assignments.
1. On Duty
– Step 1: Locate & Select the On Duty Application Form section on the sidebar of the page under section on duty subsection My Leaves.
– Step 3: Enter the following details:
- Select the on duty category & sub category.
- Select the on duty start date ( from date ) & Specify from which half of the day.
- Select the on duty end date ( to date ) & Specify till which half of the day.
- Specify the reason for the on duty on remarks filed.
– Step 4: Once all details are finalized, Employee can click on save to register that particular On duty, All the applied can be viewed in View On Duty section.
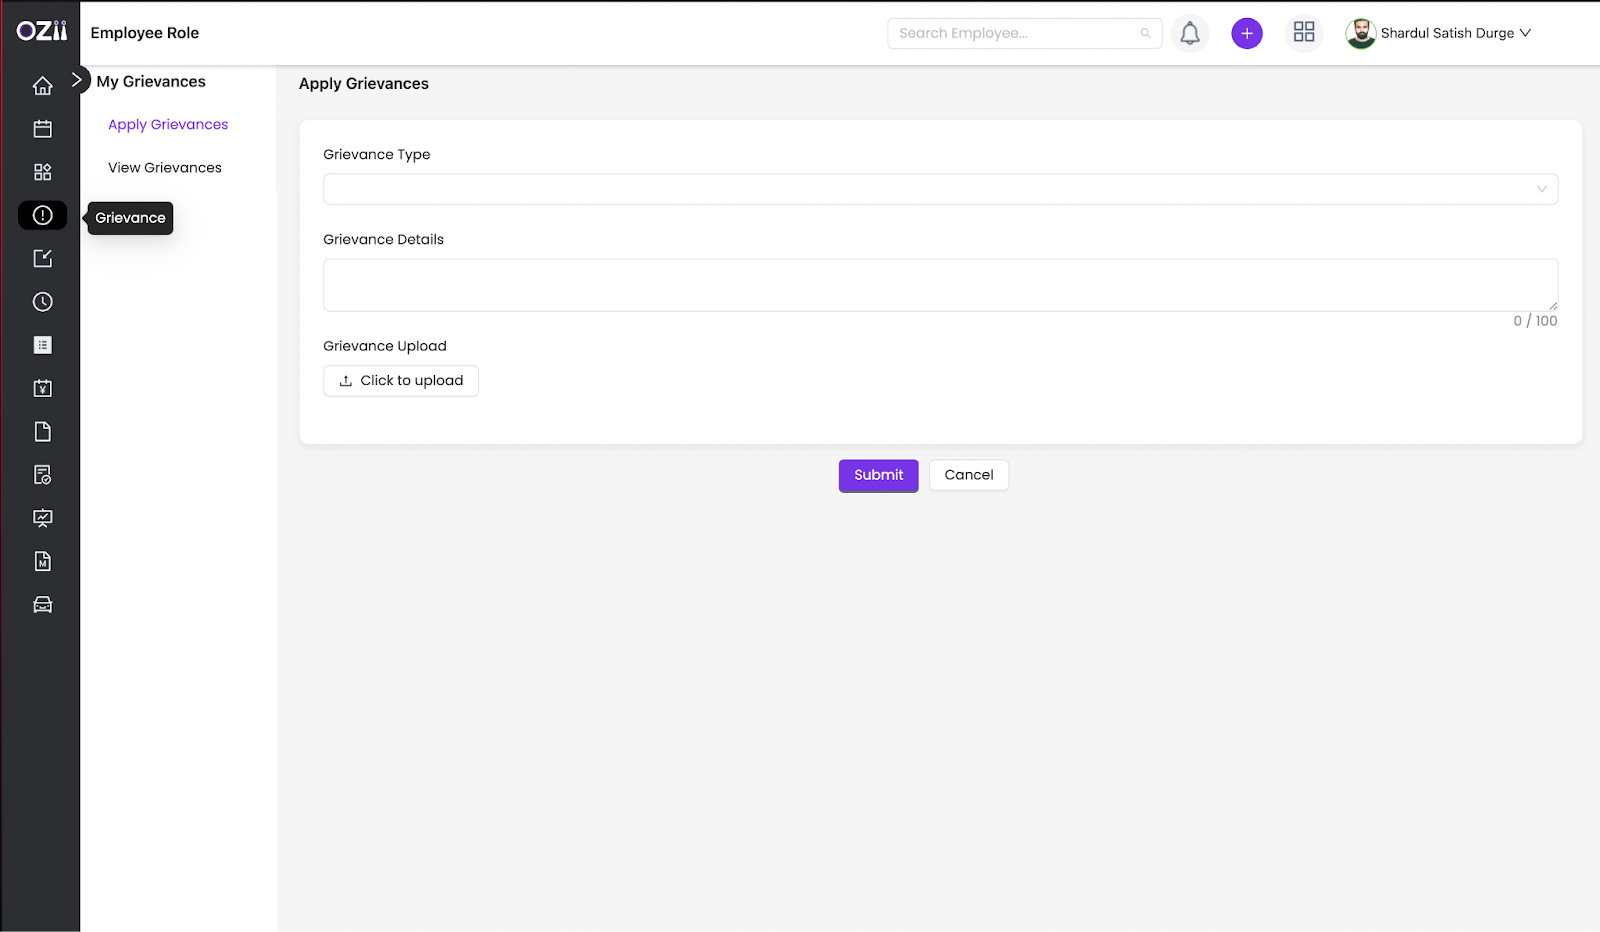
My Grievances
In the ‘My Grievances’ section, users can submit their grievances by selecting the appropriate grievance type and providing necessary details such as dates and remarks. This feature ensures a structured approach to grievance management, allowing employees to track their submissions and view the status of their complaints efficiently.
1. Apply Grievance
– Step 1: Locate & Select the Apply Grievance section on the sidebar of the page under section on duty subsection My Grievances.
– Step 3: Enter the following details:
- Specify Grievance type
- Specify Start date and end date when selecting Absent and Missed punch category, Specify an extra field of Work end time when selecting Comp Off.
- Specify Remarks for the in the field of grievance details.
– Step 4: Once all details are finalized, Employee can click on save to register the grievance. All the applied grievance can be viewed in View grievance section.
Last modified: February 12, 2025